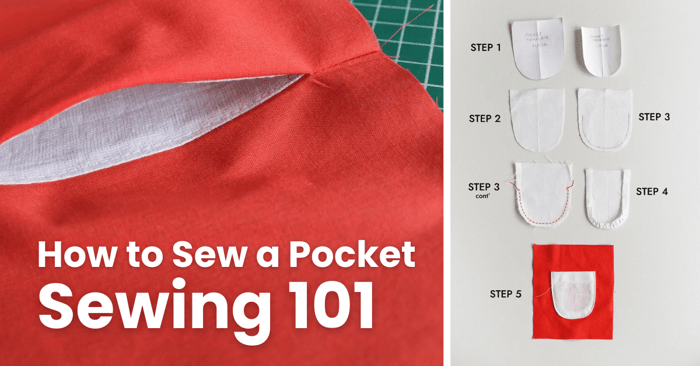
How to Sew a Pocket | Sewing 101
Today we're going to learn how to sew a pocket! Pockets, besides being practical in the way that you have a place to keep your tiny belongings, also provide a space for your hands when standing up. In addition, they serve as a blank canvas for expressing your creativity to elevate your clothes and accessories.
The pockets in today’s garments come in many shapes and sizes and they have evolved compared to the past mainly to add functionality but also as a fashion statement. In addition, nowadays pockets have been added to different types of bags, backpacks, and luggage to make these items more functional for the user.
In this article, you will learn the basics of sewing pockets, a step-by-step tutorial on how to sew an inseam pocket provided with a pocket pattern piece, and a tutorial on how to sew a patchwork pocket.
Pocket Types
Three pocket garments that are quite popular in garment construction are:
INSEAM POCKET
The inseam pockets are invisible pockets that are sewn into a garment’s side seam. These pockets are directly connected within the side seam, and they’re not the focal point but still sewn in a way to maintain the garment’s integrity and clean line.
Commonly seen on dresses, skirts, and pants, they provide the much-loved functionality feature, a space to rest your hands and keep your items. The two most common types of inseam pockets are the side seam and slant front. Side seam pockets can be placed horizontally or vertically to blend with the garment. For the purpose of this article, we’re going to show how to sew a basic inseam pocket, since there are many styles that could be done, but it’s always best to start with a basic one.

PATCH POCKET
A classic patch pocket is the easiest pocket to sew and besides proving functionality it also can accentuate your shirt or the back of your jeans. The pattern piece for a patch pocket is usually a square or rectangle which is sewn directly as a patch into fabric. Patch pockets are suitable for garment tops and bottoms.
Patch pockets come in a variety of styles such as unlined, lined, or piped. The simplest version of a patch pocket is the unlined one.
TIP: If you have never sewn a pocket before, start with a patch pocket.

INSET POCKET
An inset pocket is a type of pocket which has been inserted or set into a garment.
For example, the welt pocket is the most common type of an inset pocket which can be found in many today’s fitted jackets for men and women, but mainly clothes with a classic cut. These pockets are created by cutting an opening on the garment fabric first. Welt is the fabric strips used to cover the edges of pocket openings. Similarly, the flap pocket is created.
Inset pockets require time and dedication to detail since among other things you have to cut a hole in your garment to set the pocket. For more regarding INSET POCKETS, we do have another article that explains the basics of installing a welt pocket together with a pocket pattern, to try it out for yourself.
All other pocket shapes and designs come from these three basic pockets.

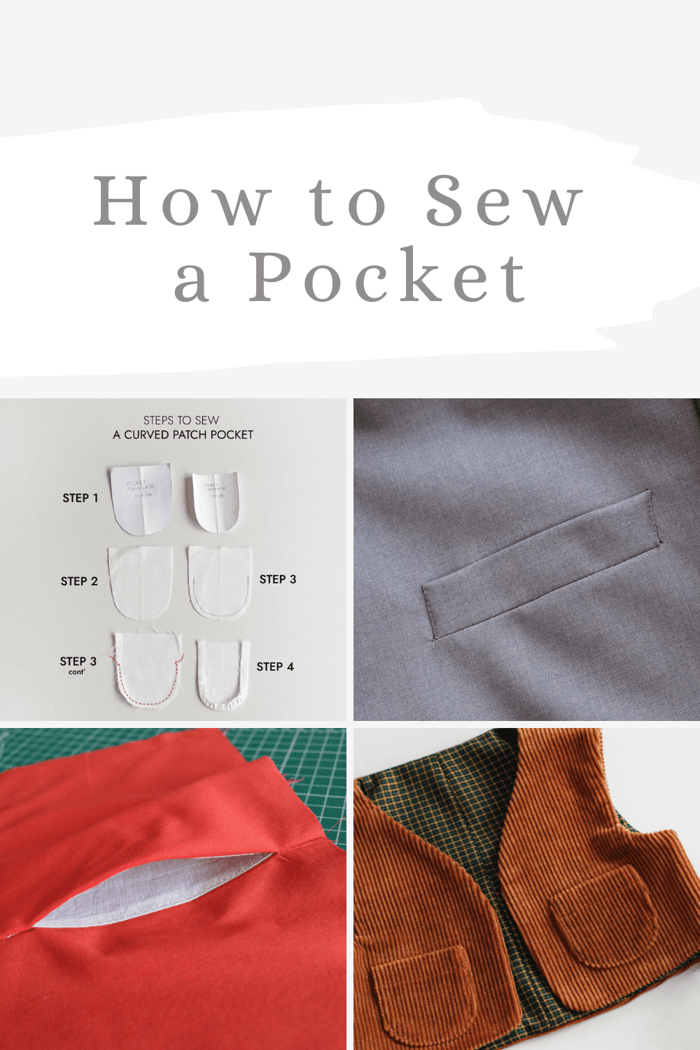
Patchwork pocket tutorial
- Download the template for the curved pocket HERE.
- Use the template with seam allowance to cut out your curved pocket.
- Mark 0.5 cm (1/4 inch) along the curved edge of the pocket with a pencil or water-soluble marker and sew a row of ease stitching.
- Pick the bottom thread and start gathering the fabric carefully along the curved edge of the pocket. Place the template without seam allowance on the wrong side of the pocket. Gently continue to pull the stitching threads to gather the pocket into a curved shape. Give the pocket a final press.
- Fold the top of the pocket 1 cm (3/8 inch) twice and sew along the folded edge. Finally, topstitch the patchwork pocket on your chosen project.

You can draft other shapes of patch pockets depending on your project. Besides the traditional rectangle and curved shapes, the tulip and heart-shaped pockets are very popular, especially in children’s clothing.
Considerations when sewing patch pockets
Pocket placement
Before finalizing sewing a pocket on a garment, determine with accuracy its placement and at the same time make sure it’s in line with the garment. Using pins or basting the pocket beforehand gives you an idea how actually the sewn pocket will look like.
Thread choice
Sewing a pocket means that you actually do some topstitching on the right side of a garment. Always go with a topstitching thread since it’s more durable and maintains its appearance even after repeated washing.
If choosing to work with topstitch thread be aware to match the thread weight with the weight of the fabric you’re using. So, depending on the thread thickness you can achieve a bold topstitch or a more subtle one.
Regular thread works very well in case you want to achieve a neat finish and stitches that provide stability.
In order to achieve neat topstitching on your pockets check out our Topstiching 101 article.
TIP: Always backstitch at the beginning and the end of the stitching to reinforce the pocket opening.
How to Sew a Pocket | Inseam pocket tutorial
Inseam pocket pattern
Having an inseam pocket pattern always comes in handy since with some very easy steps you can add pockets to your favorite skirt or dress. Download the pattern HERE. The POCKET Pattern has 1 cm (3/8 inch) seam allowance included.

Inseam pockets have a more specific placement compared to the patch pocket. Depending on the garment type pants, dress, or skirt, this type of pocket is usually placed 10- 15 cm down from the waistline.
These are just suggestion numbers but in a specific case, it would be best to measure yourself from the waistline and decide where do you want the pocket to fall.
- Cut two pairs of pockets (4 in total). If the fabric you’re using has a distinct right and a wrong side, then cut the two pairs of pockets mirrored.

- Finish the raw curved edges of all 4 pocket pieces. Some of the options to finish the raw edges include the serger, a zig-zag stitch, pinking shears, or bias tape.
- With the right sides of the fabric facing together position the pocket piece onto the skirt’s side seam and sew using a 1 cm (3/8 inch) seam allowance.

- Finish the side seam of the skirt and pocket together using your selected method.

Press the pocket and seam allowance open so that the right sides are facing up.
For a more professional finish understich the pockets so that they don’t peak on the outside of the skirt. Stitch close to the edge of the pocket (or 0.3 cm – 1/8 inch away from the pocket seam) using a regular stitch length.

Repeat these steps for the 3 remaining pockets.
With the right sides together, pin the front and the back of the skirt together at the side seam and around the curved pocket bags.

Sew down the side seams and the curve of the pockets using a 1 cm (3/8 inch) seam allowance.

Press the seams and the pockets towards the center front of the skirt and you are done!


As you can see sewing an inseam pocket is pretty straightforward and you can use this tutorial and the pattern for all of your future projects.
Final thoughts on sewing pockets
Pockets are part of our everyday garments and besides the stylish feature they offer comfort and space for our hands and to store items.
If you’re new to sewing pockets, practice on scrap fabrics first. This helps you understand the process starting with pocket placement and its marking, and then the way that is easier for you to finish with topstitching.
There are all kinds of pocket shapes and complex patterns out there, but this should not discourage you from trying it out since this article lays out all of the basics for you.
Our tip for beginners is to start with trying to sew a patch pocket preferably a rectangle one and then proceed with the next levels such as a curved pocket or a side seam one. As a result, you will easily sew both functional and stylish pockets to enhance the look of your garments.