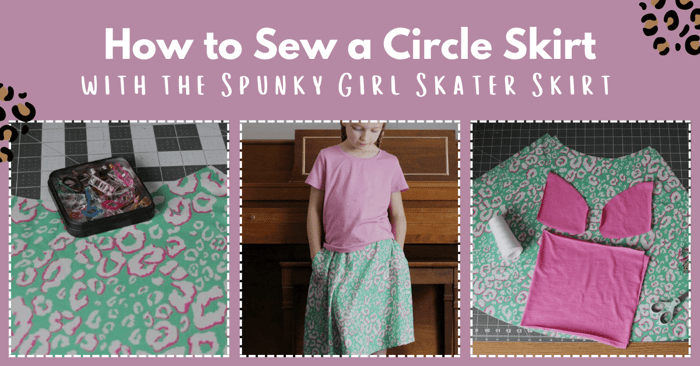
How to Sew a Circle Skirt Using the Spunky Girl Skater Skirt
Today we're going to learn how to sew a circle skirt. This is a fun, beginner friendly sewing tutorial using the Spunky Girl Skater Skirt pattern from peek-a-boo pattern shop!
The spunky girl skater skirt is a half-circle skirt pattern with optional pockets. It allows you to create a woven skirt or a knit skirt with a comfortable knit waistband.
Supplies
- Knit or lightweight woven fabric for the skirt
- Knit with a minimum of 30% stretch for the waistband
- Coordinating thread, needle and sewing machine
- Iron, clips or pins, scissors and a measuring tape/ruler
I love patterns that offer a woven and knit option all in one. It's so versatile allowing you to use the same pattern for multiple items and looks. This pattern doesn't require much yardage to make and that is a win-win too! It's basically just a fabric only pattern; no other notions needed, not even elastic! The sizes range from three months up to size twelve as well as an adult version too which I will lend more on at the end of the tutorial.
I typically add length to my daughter's skirts and dresses so feel free to make a custom fit for yours as needed. This skirt is fitted at the waist but very flowy from there on out.
Ok, so before we cut out our pattern pieces, you'll want to measure the child you are sewing for. You'll also need to decide if you would like to add pockets or not. I'll be adding pockets to mine, so you'll get to see the process for those steps in case you're on the fence about that.
If you are choosing to sew with woven fabric, you'll want to make sure you finish the edges to prevent fraying. A few ways you can finish your woven seam are: Pinking shears, zig-zag stitch or you can serge them.
I have my skirt pieces cut out and we can begin sewing up our half circle skirt pattern now.

How to Sew a Circle Skirt | Step-by-Step Tutorial
Step One: Pocket assembly
Measure one inch from the top of the skirt on both sides and place the pocket pieces right sides together with the right side of the skirt beginning at the one-inch mark. Repeat for the other side. Clip or pin in place and sew. We will be using a half inch seam allowance.

Pockets are sewn onto one of the skirt pieces as shown. Repeat the above steps for the other skirt piece and pockets.

Place the skirt pieces with right sides together as shown. The right sides of the pockets will also be together and lined up. Pin or clip the skirt in place and sew, beginning at the top, carefully working your way around the curve of the pocket and then on down the side seam. Repeat for the other side.
Here's how it should look after sewing the two skirt pieces together. Don't forget to finish your seams if using woven fabric. (I used pinking shears to finish my side seams after this photo).

Next, you'll need to decide which side of the skirt you want to be the front of the skirt. Place a bar tack stitch at the top and bottom of the skirt opening.
Here is another view of our finished pocket from the outside with the bar tack stitch in place securing the pocket to the front.
Step Two: Waistband assembly
Fold the waistband piece in half with right sides together. Sew along the short edge.

Now, we will fold the waistband in half, lining up the raw edges and enclosing the waistband seam with wrong sides of the fabric together.

Take the folded waistband and slide it over the top of the skirt. Pin or clip the waistband in quarters, lining up the raw edges of the band and the skirt together. You can align the waistband seam with the center back or choose one of the side seams to line it up with. Stretch the waistband to fit as you sew.

Fold the waistband over once.
Step Three: Hemming
Fold the hem up towards the wrong side of the skirt 3/4" and press. Topstitch the hem in place. I used a zig-zag stitch to finish the raw edge of the bottom of the skirt before hemming.

The spunky girl skater skirt is now complete! I like to go back over and press the hemline after it's been topstitched for a clean finish. (which I did after this photo)

Here is a front view of the skirt being modeled.

A back view of the skirt being worn.

Trying out those cool pockets that almost every kid desires to have!

Close up of the pocket.

If you are looking for a pattern that is minimalistic in the way of supplies but looks fashionable nonetheless then look no further and give the spunky girl skater skirt a try! I love the drape and flow of this skirt as well as how many of these you could make in a short amount of time.
I'm sure you could even draft a pair of knit short leggings to the construction of the skirt using another peek-a-boo pattern (or your own) if that would suit your needs better to make it a skirted leggings pattern. That is a need for my playful child and I almost included that in the tutorial, but I digress.
This same style of skirt can also be found in women's sizes. It is called the Seattle skater skirt and you could purchase this to match your little or just to make one for yourself!
If you purchase both the spunky girl skater skirt and the Seattle skater skirt patterns together at the same time on the website; there is a special discount coupon code you can use to save a little money and I appreciate any little incentives like that when companies make that available.
All you need to make this skirt is a little bit of fabric in either knit, woven or both (if you want to make multiples) and you'll be off to making and wearing your next favorite half circle skirt pattern.
Thank you for joining us today to learn how to sew a circle skirt. We hope you got some inspiration for your next project. Before you leave, make sure to stay connected by following Peek-a-Boo Pattern Shop on Pinterest, Instagram, Facebook, and signing up for our email Newsletter to get more wonderful ideas for sewing projects. Happy sewing!