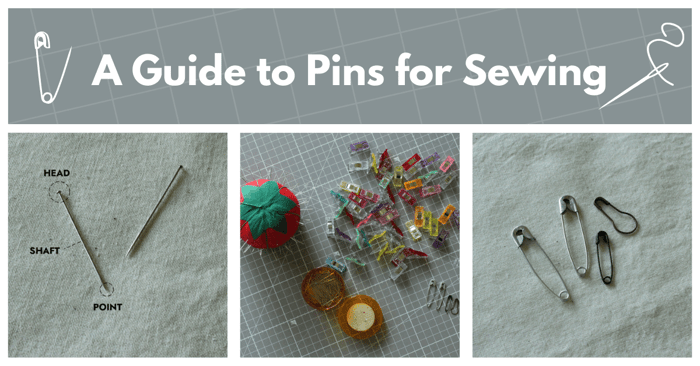
Pinning Fabric | A Guide to Pins for Sewing
Pinning fabric is an essential skill for any sewist. Sewing pins play a vital role in sewing by securing fabric layers together, holding pattern pieces in place, fitting fabric on the body, and securing decorative trims. Despite their small size, sewing pins are available in a variety of types, each suited for specific fabrics.
In this comprehensive guide, we will explore everything you need to know about pinning fabric, sewing pins, beginning with their anatomy, the various types available, techniques for pinning on fabric, and more.

Anatomy of a Sewing Pin
A simple straight pin consists of three parts: head, shaft, and point. These parts can change to suit different fabric types depending on the specific project at hand.

HEAD
The head of the pin can vary in shape, size, color, and material. The most common pin head styles include metal, plastic, and glass heads.
Plastic head pins are easy to grab and come in a variety of colors and shapes. They work great for projects that involve many layers of fabric. However, it’s important to note that most plastic head pins are not heat resistant, so caution is needed when ironing is required.


Glass head pins are heat resistant, and thinner but can bend easier therefore are preferred when working mostly with delicate fabrics.

Metal head pins feature a small head resembling a nail and are commonly used in dressmaking due to their thin shaft and sharp head. In my personal experience, I have been using these pins for years without disappointment. While they are prone to bending like most pins, they remain reliable for various sewing projects and fabrics.
 Sequin pins have a short shaft and are used for holding trims, appliques, and sequins in place.
Specialty Pins
One of the most distinctive specialty pins is the T-pin, also known as a heavy-duty pin, primarily used for upholstery and outdoor fabrics. The T-shaped head design of this pin makes it easy to grasp and allows you to clearly see its location, which is particularly beneficial when working with very thick fabrics.
Safety Pins
Safety pins have their own sizing system and range from 3/8 inch (1 cm) long to 2 inch (5 cm) long. They’re typically used in sewing, quilting, and different craft projects such as threading elastic through a casing, and as a basting tool during quilting.

SHAFT
The shaft of a sewing pin is the thin, narrow body that extends from the head to the point. The diameter, length, and metal vary depending on the intended use of the pin.
The diameter of the shaft varies from .5 mm for lightweight fabrics and up to .8 mm for medium to heavyweight fabrics. The most common pins that can be used for most of the project have a .6 mm diameter.
Pins come in different lengths, ranging from 1/2 inch (1.3 cm) to 2 inches (5 cm). Longer pins are preferred for securing layers of fabric such as during quilting, while shorter pins are ideal for holding appliques or trims in place and for transferring pattern markings to fabric.
Sewing pins can be made from various metals including stainless steel, nickel-plated steel, chrome-plated steel, or brass, each offering different properties and levels of durability depending on the specific needs of the project.
POINT
The point of a sewing pin is the part that pierces through the fabric first, and it can come as round, sharp, or extra sharp.
Sharp points are commonly used for woven fabrics and generally work well with most fabric types. An extra sharp point is particularly useful when working with delicate fabrics, allowing the pin to glide smoothly through the fabric without causing damage.
For stretchy fabrics like knits, it's essential to use a pin with a round point, often referred to as a ballpoint pin. This type of pin prevents snagging or pulling of the yarn in the fabric, ensuring the fabric's integrity is maintained during sewing.

To Pin or Not to Pin?
As a beginner in sewing, using pins is a MUST because they provide guidance during stitching and keep fabric layers securely in place. As you gain more experience with the sewing machine, you'll discover what techniques work best for you, and there may be times when you choose to sew without using pins. However, especially in the beginning, relying on pins is highly recommended.
How to Choose the Right Pins for Sewing
When selecting pins for a sewing project, start by choosing pins that are long enough to securely hold your fabric layers together. Additionally, consider the diameter (thickness) and point type of the pins based on the type of fabric you are using. If your project involves frequent ironing, opt for pins with heat-resistant heads to avoid any damage to the fabric and the iron.
There are numerous options available when shopping for pins, but you don't need to purchase every type. Once you have defined your sewing project and the specific fabric you'll be working with, it becomes easier to make the right choice regarding which pins will best suit your needs.
Pinning Fabric
There are two primary styles of pinning in sewing: perpendicular to the seam line and parallel to the seam. As a beginner, I recommend trying both styles to see which one works best for you.
The main purpose of using pins is to make sewing easier, so there is no definitive right or wrong way to pin—just the method that feels most practical for you. However, it's crucial that all the pins face the same direction to make them easier to remove while sewing.
When pinning, space each pin approximately 1-2 inches (2 to 5 cm) apart and aim to pin within the seam allowance whenever possible. Remove each pin before the sewing needle reaches it to avoid any accidents or damage to your machine.
For tasks involving bias binding, curved necklines, or attaching sleeves to a garment, you will likely need to use more pins due to the nature of the curves. This is perfectly normal and helps ensure that the fabric is properly aligned and sewn smoothly along the curves.

Perpendicular Pining Fabric
Insert the pin perpendicular to the fabric's raw edge and make sure the pin’s point points toward the stitching line. This way you can grab the pin’s head and remove it with your right hand as you stitch. As you sew remove the pin before it gets under the pressing foot.

Parallel Pining
When parallel pinning, place the pins directly on the stitching line with the pinheads facing toward you as you sew. This orientation allows for easy removal of the pins as you stitch.
Parallel pinning requires fewer pins compared to perpendicular pinning, and it also minimizes the number of pinholes created outside of the seam allowance.
Can You Sew Over Pins?
Generally, is recommended to avoid this practice to protect your sewing machine, avoid broken and bent sewing needles, and prioritize safety during sewing.
Instead of relying on sewing pins, consider these alternative techniques instead:
Hand Basting: Temporary stitch by hand to hold fabrics together before sewing. This technique eliminates the need for pins and keeps the fabric layers in place.
Sewing Clips: Use fabric clips instead of pins for holding fabric layers together. Clips are especially useful for holding many layers of fabric together and for sewing delicate or waterproof fabrics, where you want to avoid creating holes by using pins.

Pin Removal: Remove pins just before they reach the presser foot while sewing. This allows you to maintain control over fabric placement without sewing over the pins themselves.
Fabric Weights: a great alternative to pins to hold pattern pieces on fabric.
Pin Storage
Typically, sewing pins are packaged in reusable mini containers that close securely and have printed information about the pin type and usage. If not used very often keep each pin type on their specific container so they don’t get mixed with other pins.

On the other side, there are many options to choose from for pins you’re actively using. It is all about easy access during sewing and some of the options include pin cushions, wrist cushions, magnetic holders, magnetic wrist holders, and more.
Each type of pin holder serves a specific purpose, so it's important to select one that fits well with your sewing routine and preferences.
For example, I prefer the traditional tomato pin cushion for its cute shape, but it also comes with mini a strawberry-shaped attachment filled with emery powder. This filling cleans and sharpens the pins when they’re inserted and pulled out of the strawberry shape.

Ultimately, the choice of a pin holder is a personal preference based on your sewing habits and what works best for you in terms of accessibility and functionality. Experiment with different options to find the one that fits your needs.
Some Final Tips for Sewing with Pins
• Avoid using bent, rusted, or damaged pins to avoid fabric damage.
• Check your pins from time to time, since as the sewing needles, pins can become dull and potentially cause fabric damage. Usually with a dull pin is difficult to pierce through fabric.
• Store different types of pins separately to avoid mix-ups.
• Always keep a pin box close to the sewing machine, so you can safely store them as you sew.
Sewing with Pins – Conclusion
In summary, there is no definitive right or wrong way to pin fabric when sewing. It's beneficial to gather information about different types of pins, and pinning techniques, and to practice determining what works best for you. Do the research and choose sewing pins according to your project, and selected fabric (weight and type). Take your time with slippery fabrics and be extra patient with sewing curves.
Thank you for joining us today to learning more about pinning fabric. Before you leave, make sure to join our Facebook Group and follow us on Instagram. Happy Sewing!