Seam Allowance Guide | Sewing 101
Welcome to our Seam Allowance Guide. This Sewing 101 blog article is meant to help you know a little more about seam allowances. We'll go over what they are, why they're important, and what you need to remember about seam allowances when sewing. A seam allowance is the area between the sewing line and the raw edge of the fabric. It provides room for stitching and helps to secure the fabric pieces together. In this comprehensive guide, we will explore the importance of seam allowances in sewing projects and provide you with essential tips and techniques for achieving accurate seam allowances.
Let's get started on the seam allowance guide!
What is seam allowance and why do we need it?
In simpler terms, the seam allowance keeps clothes together. If you were to sew the very edge of your fabric together, there would be no seam stability, and the pressure close to the stitching line would be high, resulting in holes and frayed seams.
An adequate seam allowance ensures seam stability and enables future alterations on a garment. For example, if a 3/4 inch (2 cm) seam allowance is added to the side seams of a custom dress, this amount plays a major role in altering the dress if fit issues arise.
Referring to the illustration we define seam allowance as the SPACE/AREA between the seam line (stitching line) and the raw edges of the fabric. The seam allowance amount depends on the garment type, fabric, seam finish, and whether the sewing pattern is finished or just a self-drafted block.
Here's a handy graphic:

The benefits of choosing the correct seam allowance for your garment:
- Correctly applied seam allowances give finished seams stability and integrity thus ensuring the longevity of the garments.
- Allows for future garment alterations thus providing an alternative in case adjustments are needed.
How much seam allowance is enough?
There is no simple answer to this question since it all depends on fabric type, seam finish, and the type of garment you’re constructing. Standard seam allowances are a great starting point when you're new to sewing, but as you dive into more detailed projects, you’ll have to make some decisions regarding your seam allowance.

Standard Seam Allowances
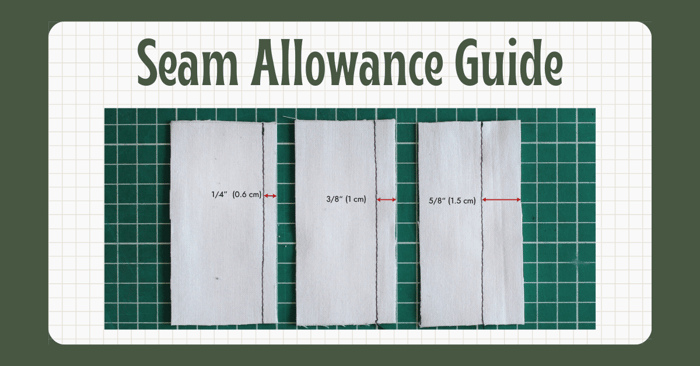
Seam allowances of 5/8 inch (1.5 cm) and 3/8 inch (1 cm) are commonly found on sewing patterns from commercial and indie pattern companies in the US and Europe. Information about the seam allowance can typically be found in the patterns instructions, and in some cases, it may also be indicated on each individual pattern piece.
Some pattern companies offer patterns without seam allowances, leaving it up to you to define the desired amount to add to each pattern piece. In such cases, it's important to ensure that the added seam allowance on each piece effectively complements the others.
Seam allowances of ½ inch (1.3 cm) and ¼ inch (0.6 cm) are commonly found on ready-to-wear garments. However, the smaller seam allowance on ready-to-wear garments usually does not provide sufficient seam allowance if future alterations if needed.
Curved and straight seam allowances
Generally, curved seams, such as necklines, armholes, cuffs, and specific curvy seams, usually require a smaller seam allowance, such as ¼ inches (0.6 cm), to reduce bulk along the seam and create a clean and neat finish.
Straight seam allowances, such as those found on skirts/dresses' side seams, center back, and center front side seams, require 3/8 to 3/4 inches (1 to 2 cm). For example, if the center back of a dress has a zipper, then a minimum of 3/4 inch (2 cm) is required to sew the seam and accommodate the zipper.
On the other hand, if you’re sewing a toile dress, having 6/8 inch (2 cm) on each side seam is extremely helpful since it offers the flexibility to let out the seam and define fit before sewing a final garment.
Other seam allowance options
- Specific seam finishes, such as the French seam or the flat felled seam, require a 5/8-inch (1.5-cm) seam allowance.
- When using a serger to finish seams, the required seam allowance ranges from 3/8 to ½ inch (1 to 1.3 cm) depending on the type of serger being used.
- For quilting purposes, ¼ inch (0.6 cm) is the gold standard to prevent bulky seams.
- Coat or jacket construction often requires a larger seam allowance of up to 1 inch (2.5 cm). seam allowance. This is done to accommodate the heavier fabrics being used and the structural elements involved.
When not to add seam allowance
A seam allowance is unnecessary when cutting fabric on fold and binding seams. Sewing patterns provide additional instructions for when a pattern piece should be cut on the fold or when bias binding is necessary. However, if you're drafting your own patterns and these elements are part of your design, it's important to mark which pattern pieces are intended to be cut on the fold.
For example, if sewing a T-shirt (illustration 2), both front and back pattern pieces are placed on the fold of the fabric; therefore, no seam allowance is added to the center front and center back.
On the other hand, if sewing a woven shirt (illustration 3), taking the simplest design as an example, the front is cut on the fold. Still, the back pattern piece requires a 3/4 inch (2 cm) seam allowance to accommodate features like a button closure or zipper, ensuring ease of wear without any difficulties.

Adding seam allowance to your pattern pieces
To add seam allowance to your pattern pieces you will need: a water-soluble pen or chalk, a transparent straight ruler, and a curved ruler for curved seams such as the neckline and the armholes (*optional- it can be done with a straight ruler too) and lastly define the amount of seam allowance you plan to add.
- Place the pattern pieces on fabric or paper and make sure to have enough space between each pattern piece.
- Secure the pattern pieces with pins or weights so there’s no movement while marking the seam allowance. Also, take a water-soluble pen/ chalk and a ruler and be ready to start.
- Make a series of dots around the pattern pieces while measuring from the edge of the pattern piece to your chosen seam allowance. Connect the dots to mark the seam allowance around the pattern pieces.
- Make sure that all the pattern pieces that join with a seam have equal seam allowance.
- Don’t add seam allowance on a seam that needs to be placed on the fold. Define how much you need to add as a hem allowance depending on the garment that you’re constructing.

How to maintain even seam allowance throughout the project?
When you're new to sewing, it can be difficult to guide the fabric through the sewing machine while trying to keep a straight seam and, on the other hand, control the pedal foot with the right amount of speed. These factors can significantly impact the seam allowance throughout your project, so it’s very important to take control measures and practice a lot.
In addition is necessary to follow the exact seam allowances outlined in the chosen pattern. For example, if a pattern requires a 3/8 inch (1 cm) seam allowance, you must use exactly 3/8 inch (1 cm) otherwise you potentially end up with seams that do not line up.
Seam Allowance on Sewing Machine
Familiarize yourself with seam allowance markings on the throat plate under the needle. While these markings may vary between sewing machines, they typically include markings up from ¼ to 1 inch (0.6 to 2.5 cm).

Next, align the raw edge of the fabric with the marking (let’s take as an example a 5/8 inch (1.5 cm) seam allowance). Remember that these markings on the needle plate are accurate only when the needle is in the center position so double-check before sewing.
Although it can be challenging as a beginner, keep an eye on the edge of the fabric to ensure that it is always lined up with the seam guide.

Create a seam guide on the plate using painter’s tape, and a rubber band, and line up the fabric to the edge of your guide while sewing.

Consider investing in seam guide attachments like magnetic seam guides, that easily stick to the throat plate for precise seam allowances.
Depending on your sewing projects use specific sewing foots such as for example for quilting the ¼ inch (0.6 cm) foot is a perfect addition to make the process easier.
Before purchasing any seam guide foot make sure to check if they are compatible with your sewing machine. Consult the sewing machine manual or seek more information online.
When to trim the seam allowance?
Trimming is always recommended on curved seams such as necklines, armholes, princess seams, or any other seam that has a round/curved shape. It helps to reduce that extra amount of fabric that adds to the bulk but also makes topstitching neater in case it is required.
As for straight seams, whether to trim or not depends on the seam location and the chosen seam finish.
Pressing the seam allowance
Pressing the seam allowance is a crucial step for achieving a professionally finished garment. Begin by pressing the seam allowance flat to one side (this helps to set the threads and gives the seam line a neat finish). Next, press the seam allowance open and finish the seam using your chosen technique.
Avoid ironing everything at at the end of the project. Instead, press as you sew each seam line.

What about Hem Allowance?
The hem allowance is the width between the hemline and the fabric hem edge. It is folded on the wrong side of the fabric, and depending on the garment type, it can be from ¼ to 2 inches (0.5 to 5 cm). The hem allowance creates a clean and neat finish for the garment hemline.
The hem allowance length is typically determined based on the garment design and fabric type. For lightweight fabrics commonly used in shirts and summer dresses, a smaller hem allowance is required to minimize unnecessary bulk.
On the other hand, a larger seam allowance is required for thicker fabrics to provide structure and stability to the hemline.
 The Role of Seam Allowances in Quilting
Seam allowances play a crucial role in quilting and home decor projects too. In quilting, accurate seam allowances ensure the quilt blocks align correctly and that the finished quilt top lies flat and square. The standard 1/4 inch seam allowance is often used in quilting to achieve precise piecing and accurate block measurements. Home decor projects, such as curtains, pillowcases, or table runners, also rely on precise seam allowances to ensure proper fit and construction. By paying attention to seam allowances, quilters and home sewists can achieve professional-looking results in their projects.
Seam Allowance Guide Frequently Asked Questions
How Do I Choose the Right Seam Allowance for My Project?
The right seam allowance for your project depends on several factors, including the type of project, fabric type, and sewing machine. It is important to refer to the pattern instructions or consult a sewing tutorial that provides specific recommendations for seam allowances based on the project requirements.
Can You Adjust Seam Allowances for Fit?
Seam allowances can be adjusted for fit in some cases. If a garment needs to be smaller, you can reduce the seam allowance to achieve a tighter fit. Conversely, you can increase the seam allowance if a garment needs to be larger. However, it is important to consider the construction and design of the garment and consult a sewing tutorial or pattern for guidance on adjusting seam allowances for fit.
What Are the Best Practices for Pressing Seam Allowances?
Pressing seam allowances is an essential step in sewing. The best practice is to press the seam allowances open or to one side, depending on the project and fabric. Use an iron at the appropriate temperature for the fabric to ensure a crisp and professional finish.
How to Deal with Varying Seam Allowances in Patterns?
When working with patterns that have varying seam allowances, consistency throughout the project is important. Measure and mark the correct seam allowance for each pattern piece and ensure the stitching aligns with the marked lines. Consulting a sewing tutorial or pattern guide can provide additional guidance on dealing with varying seam allowances in patterns.
Tips for Beginners on Seam Allowances
Understanding and working with seam allowances can be a learning curve for beginners. Here are some tips to help beginners with seam allowances:
- Use a seam guide ruler or marking tool to accurately measure and mark seam allowances.
- Practice sewing straight lines and maintaining consistent seam allowances.
- Take your time and sew slowly to ensure accuracy.
- Consult sewing tutorials or join a sewing class to learn more about seam allowances and their importance in sewing.
Seam Allowance Guide Conclusion
Understanding seam allowances is crucial in achieving professional sewing results. It provides room for adjustments and ensures your project turns out as intended. You can elevate your sewing skills by mastering techniques like measuring, choosing the right tools, and correcting errors. Avoiding common mistakes and exploring advanced techniques like working with curved seams will further enhance your craftsmanship. Remember, perfecting seam allowances is a key aspect of sewing that can significantly affect the quality of your finished projects. Keep practicing and experimenting to find what works best for your sewing projects.
Thank you for joining us today for our seam allowance guide. Before you leave, make sure to keep in touch by following us on YouTube or Instagram. You can also join our Facebook Group to keep up to speed on everything we're doing. Happy Sewing!


