Sewing 101 – How to read a sewing pattern
Table of Contents
Learning how to read a sewing pattern might feel overwhelming at first, especially when you're new to sewing. Sewing patterns contain specialized terms, symbols, instructions, and pattern pieces that all work together—and they don't make sense without understanding each element. Once you master how to read a sewing pattern, you'll be able to confidently interpret patterns from any brand or designer.
In this comprehensive guide on how to read a sewing pattern, we're covering step-by-step tutorials for both paper and digital sewing patterns, the importance of each pattern element, the most common terms and symbols used, and helpful tips for choosing the right pattern as a beginner sewist.
What is a Sewing Pattern?
Think of a sewing pattern as a detailed blueprint with step-by-step instructions and visual guides that show you exactly how to construct a garment, bag, or soft toy. Learning how to read a sewing pattern is like learning a new language—once you understand the basics, every pattern becomes easier to decode.
Printed vs Digital Sewing Patterns
Before learning how to read a sewing pattern, it's important to understand the two main formats available:
Printed/Traditional Paper Patterns
Printed sewing patterns are sold in envelopes that include tissue paper pattern pieces and an instruction sheet. These patterns are excellent for beginners or those who prefer ready-to-use options with no printing required. Traditional paper patterns tend to have a higher cost and sometimes provide less detailed instructions than their digital counterparts. The tissue paper is also susceptible to wear and tear over time.
Digital (PDF) Patterns
Digital patterns are purchased online directly from pattern companies or third-party stores like Peekaboo Pattern Shop. They include downloadable files that you print at home or at a copy shop. Digital patterns are more affordable and typically provide more detailed sewing instructions with photographs or illustrations.
Once purchased, a PDF pattern lives in your digital library forever, and you can reprint it whenever pattern pieces are lost or damaged. Digital patterns offer immediate access, so you can start your project right away.
How to Read a Traditional Sewing Pattern
Understanding how to read a traditional sewing pattern starts with examining three key components:
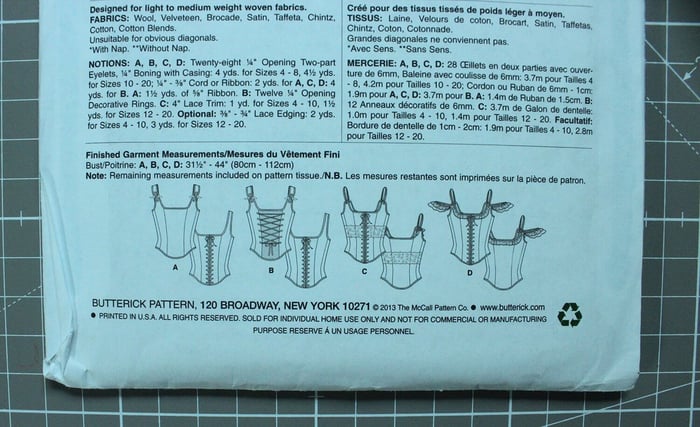
The Pattern Envelope
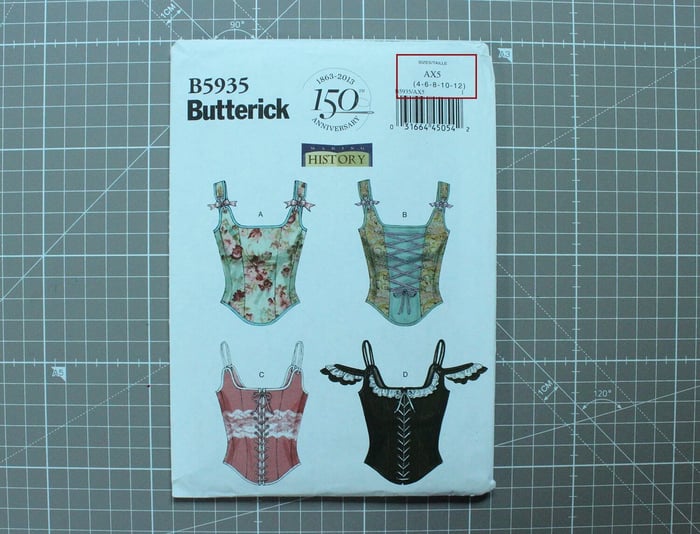
The pattern envelope provides crucial information at a glance. The front displays how the finished garment looks—either as a photograph or flat sketch illustration—along with the available size range.
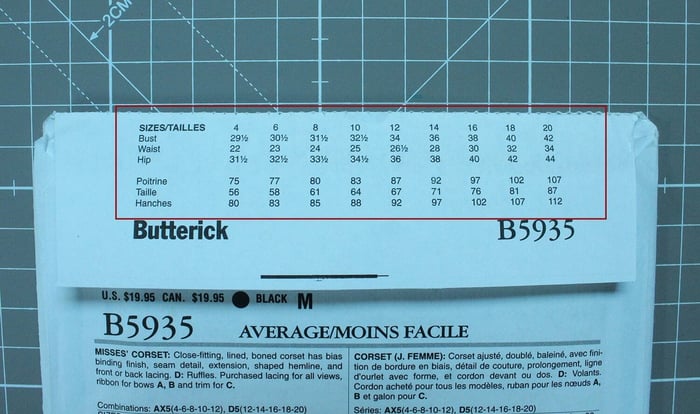
The back of the envelope contains essential planning information:
Size Chart: Includes bust, waist, and hip measurements to help you select the correct size.
Fabric Suggestions, Yardage, and Notions: Use this section as your shopping guide. Pay attention to fabric width requirements and consider purchasing slightly more yardage than specified—it's better to have extra fabric than run short.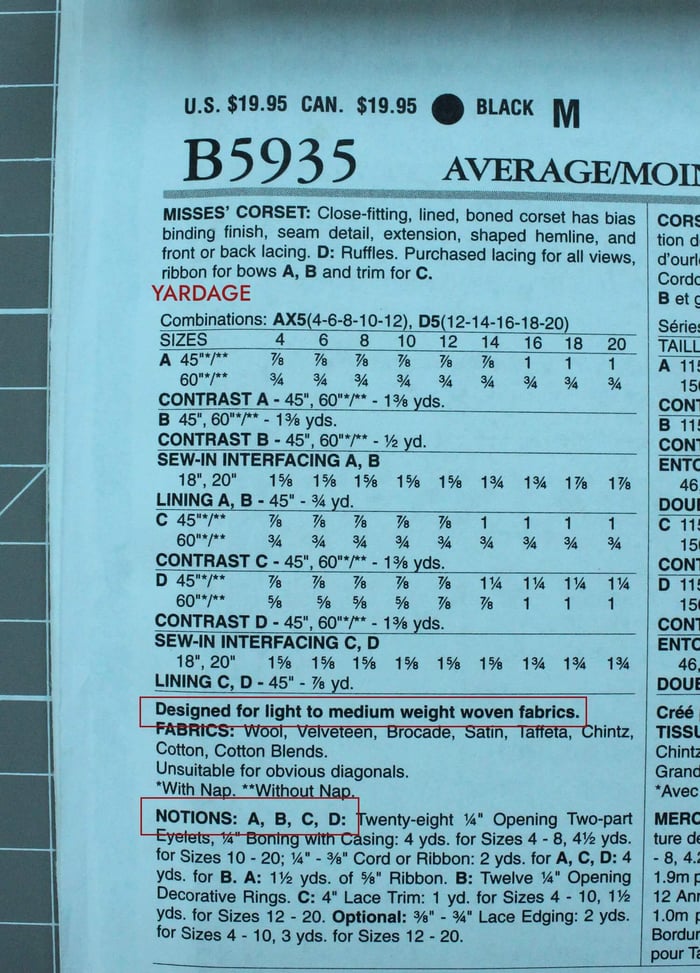
The Instruction Sheet
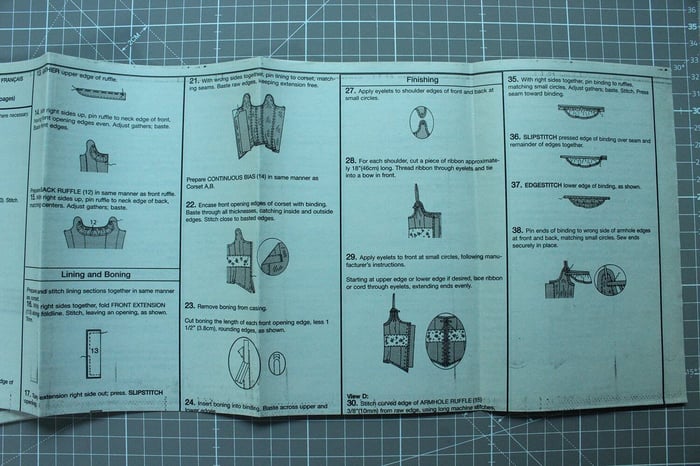
The instruction sheet inside the envelope is your roadmap for construction. When learning how to read a sewing pattern, always review these instructions thoroughly before cutting fabric. Instruction sheets typically include:
- Cutting layouts showing how to position pattern pieces on fabric
- Pattern placement guidelines (grainline, bias, fold lines)
- Pattern markings and adjustment lines
- Seam allowance information
- Step-by-step sewing instructions
Reading through instructions first helps you understand the entire construction process and avoid potential mistakes during sewing.
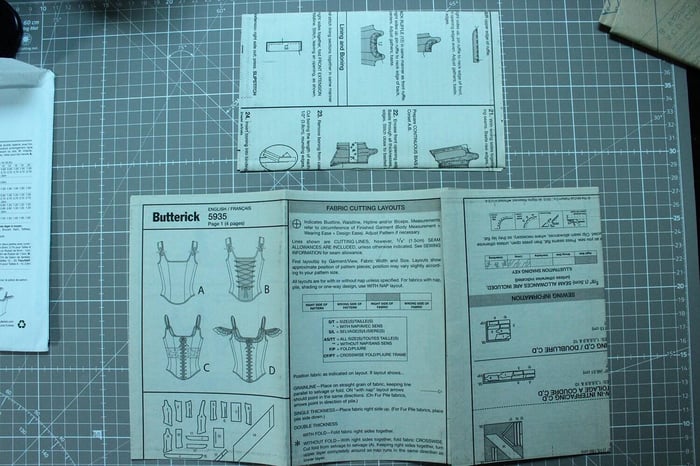
The Paper Pattern Pieces
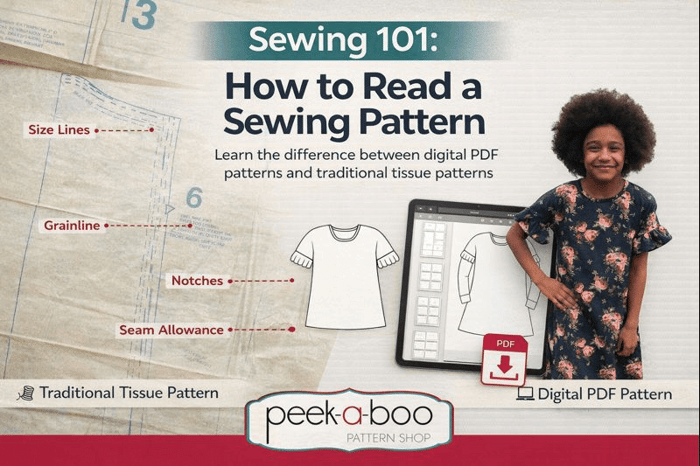
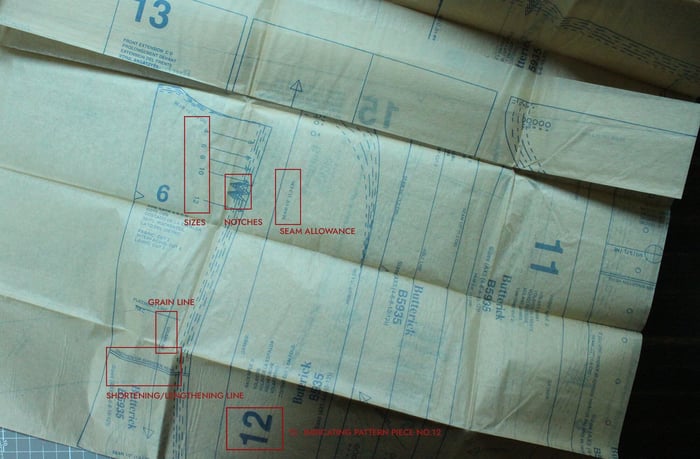
When you unfold traditional sewing pattern tissue paper, you'll see many overlapping lines—this is normal for multi-sized patterns where each line represents a different size. Learning how to read a sewing pattern includes identifying your correct size line.
To use a multi-sized pattern:
- Find the cutting line for your chosen size
- Either cut directly on that line, or trace your size onto pattern paper to preserve all sizes
- Transfer all markings, notches, and symbols from each pattern piece
After cutting your pattern pieces and reviewing the instructions, you're ready to begin construction. Follow the instruction sheet step by step, matching notches and pressing as directed.
How to Read a Digital (PDF) Sewing Pattern
Digital patterns follow a similar structure but with some key differences. After purchasing a PDF sewing pattern, you typically receive a folder containing several files:
- Sewing instructions (PDF)
- Print-at-home pattern pieces (A4 or Letter size)
- A0 copy shop file (optional)
- Projector file (optional)
Remember: No matter which pattern type you use, always start by reading the instruction file completely before beginning your project.
Let's explore how to read a sewing pattern using one of our patterns as an example.
Pattern Cover and Introduction
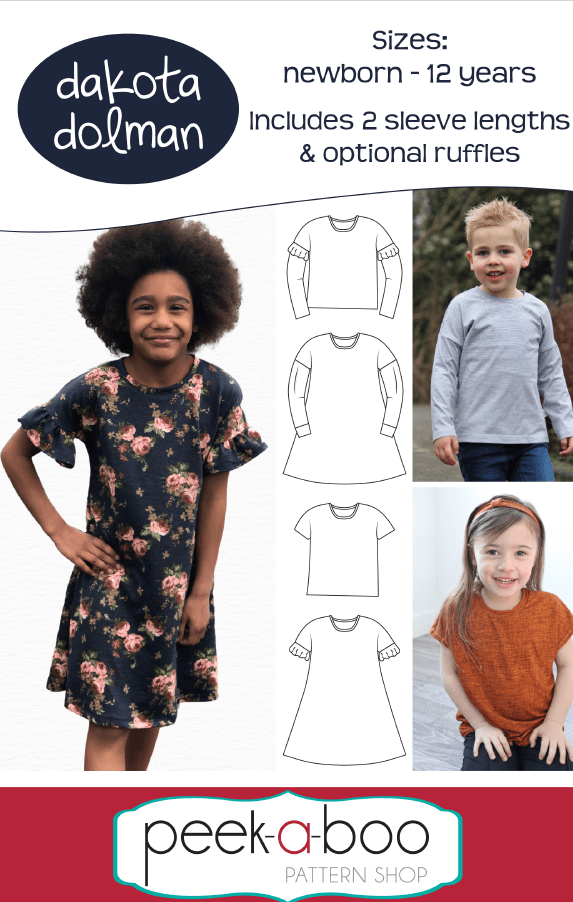
This is the cover of our Dakota Dolman pattern, which features a wide size range from newborns up to 12 years old.
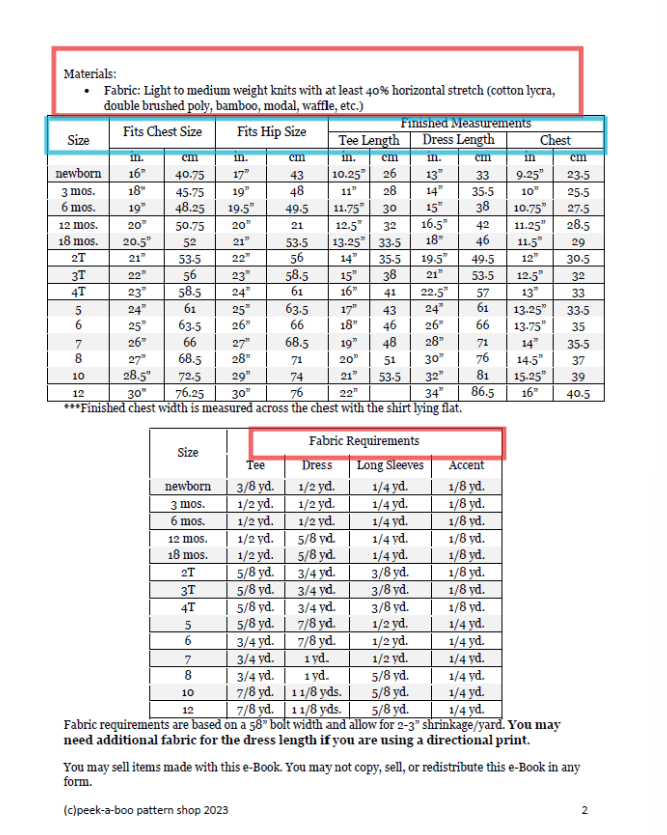
Fabric Recommendations and Materials
The first page provides information about suitable fabrics. When learning how to read a sewing pattern, pay close attention to fabric recommendations—patterns are drafted with specific fabric types in mind, and substituting dramatically different fabrics can affect fit and appearance.
To determine your size, take bust, waist, and hip measurements and compare them to the body measurements in the size chart. The finished garment measurements are typically larger than body measurements due to wearing ease, which allows for movement and comfort.
Check the required yardage before shopping for fabric.
Choosing Your Size and Garment Views
Most patterns provide a garment fit description and show different views you can create. When your measurements fall between two sizes, you can choose to size up, size down, or blend between sizes depending on your fit preferences.

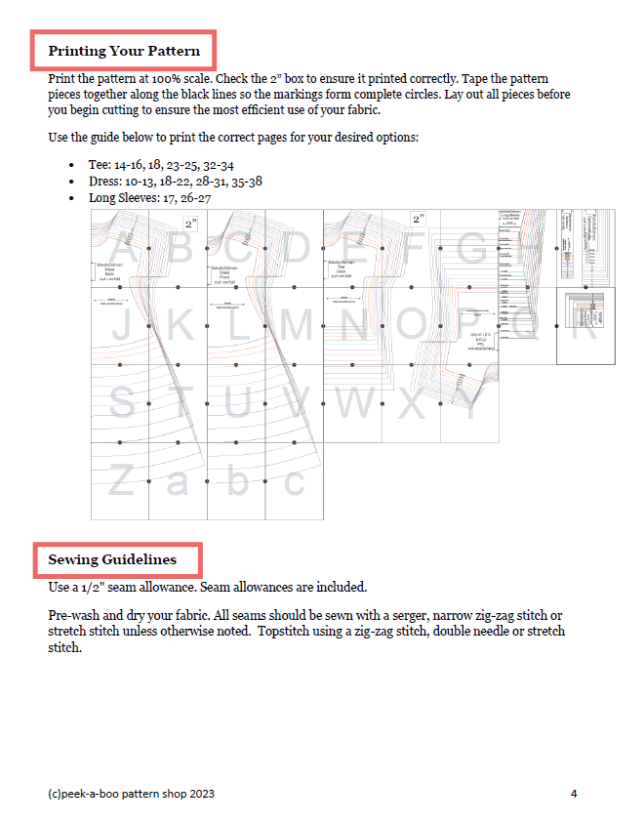
Printing and Assembly Instructions
Before printing all pattern pages, locate the test square page to verify your print settings are correct. In our patterns, the test square measures 2 inches × 2 inches. If your printed square doesn't match these dimensions, adjust your print settings or try a different PDF reader.
Print only the pages you need for your chosen view—this saves paper and ink. When learning how to read a sewing pattern, note important details like:
- Which pages to print for your specific view
- Seam allowance information (our patterns include ½" seam allowance)
- Assembly instructions for taping pages together
If you plan to use special seam finishes that require extra seam allowance, make sure your pattern accommodates this or add extra allowance when cutting.
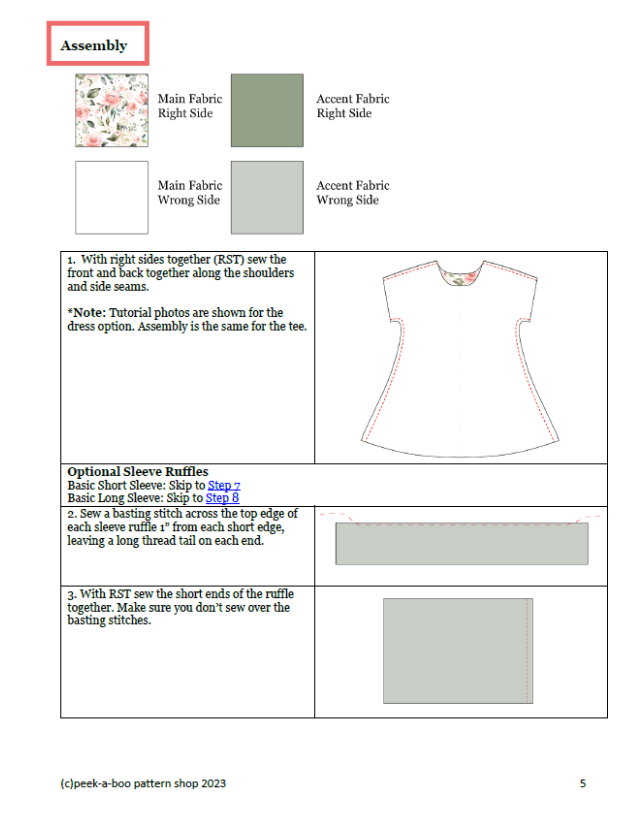
Understanding Illustrations and Assembly
When instructions include illustrations, check the illustration key that shows the right side versus wrong side of fabric. As a beginner learning how to read a sewing pattern, following each step precisely ensures accurate results.
Most pattern companies offer support through email or social media groups where you can ask questions, discover pattern hacks, and connect with other sewists.
Each digital sewing pattern varies in content depth and detail. More complex patterns may include additional techniques beyond basic construction. This is why choosing patterns appropriate for your current skill level is crucial—start with beginner-friendly patterns and gradually increase difficulty as your skills improve.
Common Sewing Pattern Terms
Understanding terminology is essential when learning how to read a sewing pattern. Here are the most common terms you'll encounter:
SEAM ALLOWANCE - The space between the fabric edge and the stitching line.
NOTCHES - Marks used to match up seams accurately.
FOLD LINE - A line indicating the pattern piece should be placed on folded fabric when cutting.
EASE - Extra fabric included in pattern pieces to allow for movement and comfort.
GRAINLINE - An arrow showing the direction of the fabric's threads (warp and weft).
DARTS - Triangular folds of fabric sewn to create shape around curves like the bust, waist, or hips.

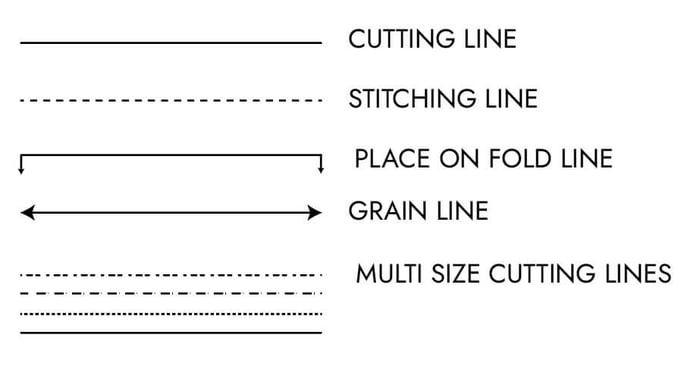
Common Pattern Lines and Symbols
Pattern lines serve as visual guides for determining pattern size, adjusting length, correct placement, and making alterations. When learning how to read a sewing pattern, understanding these lines is crucial:
- Cutting lines - Show where to cut for each size
- Lengthen/shorten lines - Indicate where to adjust pattern length
- Placement lines - Show where to position pockets, buttons, or other details
- Adjustment lines - Guide you in making fit modifications
Tips for Beginners Learning How to Read a Sewing Pattern
Choose beginner-friendly patterns: Start with simple designs that have fewer pattern pieces and straightforward construction, such as an elastic waist skirt.
Make a test garment: Create a wearable muslin using inexpensive fabric. This allows you to check fit and make adjustments before cutting your final fabric.
Check seam allowance: Always verify whether seam allowance is included in your pattern and how much. Some patterns come without seam allowance, so you'll need to add it based on your chosen seam finish.
Measure carefully: Double-check the size chart against your body measurements. Taking accurate measurements ensures you select the right pattern size.
Read instructions completely: Review all steps before starting. Understanding the entire construction process prevents mistakes and builds confidence.
Final Thoughts
Learning how to read a sewing pattern is your first step toward becoming a skilled and confident sewist. While sewing patterns contain many elements to consider, taking time to understand each component pays dividends in your finished projects.
When learning how to read a sewing pattern, remember to review all instructions before starting your project, gather necessary tools and materials, and complete any prep work like pattern adjustments or fabric pre-washing.
Don't hesitate to ask questions! Pattern designers and the broader sewing community are incredibly supportive. Our website offers 25+ free sewing patterns when you join our newsletter or Facebook group. This community provides invaluable guidance and suggestions when working with our patterns.
Ready to put your new skills to practice? Browse our collection of PDF sewing patterns and start your next project with confidence!
FAQs
How to Read a Sewing Pattern
Q: How do I read a sewing pattern for the first time?
A: Start by reading the entire instruction booklet or PDF before touching fabric or scissors. Identify the pattern pieces you need, check the size chart, verify seam allowances are included, and familiarize yourself with the symbols and markings. Understanding the complete construction process before beginning prevents mistakes and builds confidence.
Q: What's the difference between paper and PDF sewing patterns?
A: Paper patterns come pre-printed on tissue paper in an envelope with instructions included, ready to use immediately. PDF patterns are digital files you download and print at home or a copy shop. PDF patterns are typically more affordable, offer more detailed instructions with photos, and can be reprinted if lost. Paper patterns cost more but require no printing equipment.
Q: How do I know which size sewing pattern to buy?
A: Take accurate body measurements of your bust, waist, and hips, then compare these to the pattern's size chart—not your ready-to-wear clothing size. Pattern sizes often differ from retail sizing. If your measurements fall between sizes, consider sizing up for comfort or choosing the size that matches your largest measurement, then adjusting other areas if needed.
Q: What does seam allowance mean on a sewing pattern?
A: Seam allowance is the space between the fabric edge and your stitching line. Most patterns include seam allowance (commonly ⅝" or ½"), but some patterns require you to add it yourself when cutting. Always check the pattern instructions to know whether seam allowance is included and how much is provided.
Q: What are notches on a sewing pattern?
A: Notches are small triangular or diamond-shaped marks on pattern pieces that help you align and match seams accurately during construction. When you see notches on two different pattern pieces, you match them up when sewing those pieces together. They're essential for proper garment assembly, especially on curved seams.
Q: What does "cut on fold" mean on a sewing pattern?
A: "Cut on fold" means you should place that edge of the pattern piece on folded fabric so when you cut and unfold the fabric, you get a symmetrical piece that's twice as wide. This creates a center front or center back with no seam. The fold line is usually marked with a line and arrows pointing in both directions.
Q: What is grainline on a sewing pattern and why does it matter?
A: Grainline is an arrow on pattern pieces showing which direction to align with the fabric's lengthwise threads (parallel to the selvage). Following grainline ensures your garment hangs properly and has the right amount of stretch or drape. Ignoring grainline can result in twisted seams and garments that don't fit correctly.
Q: Do all sewing patterns include seam allowance?
A: No, not all patterns include seam allowance. Most commercial and indie patterns include seam allowance (typically ⅝" or ½"), but some European patterns and vintage patterns may not. Always check the pattern instructions. If seam allowance isn't included, you'll need to add it when tracing or cutting your pattern pieces.
Q: What does ease mean in a sewing pattern?
A: Ease refers to extra room built into a garment beyond your exact body measurements. Wearing ease allows for movement and comfort—without it, garments would be skin-tight and impossible to wear. Design ease is additional fullness for style purposes, like an oversized look. Patterns specify how much ease is included in finished measurements.
Q: How do I read pattern markings and symbols?
A: Common pattern markings include dots (matching points), lines (fold lines, placement lines), triangles (notches for matching seams), dashed lines (stitching lines or fold lines), and double-headed arrows (grainline). Your pattern instructions should include a key explaining what each symbol means. Transfer these markings to your fabric using tailor's chalk, fabric markers, or tailor's tacks.
Q: What does it mean to "grade between sizes" on a pattern?
A: Grading between sizes means cutting different sizes at different points on your body when your measurements fall into multiple size ranges. For example, you might cut a size 8 at the bust, transition to a size 6 at the waist, and grade back to an 8 at the hips. This creates a custom fit without requiring extensive pattern alterations.
Q: Should I make a muslin before cutting my good fabric?
A: Making a muslin (test garment in inexpensive fabric) is highly recommended for fitted garments, expensive fabric, or when trying a new pattern company. Muslins let you check fit, make adjustments, and practice construction techniques without risking good fabric. For simple projects with forgiving fabrics, you might skip this step.
Q: Why don't my body measurements match pattern sizing?
A: Pattern sizing differs significantly from ready-to-wear clothing sizes and varies between pattern companies. Pattern sizes are based on body measurements, not vanity sizing used in retail. A commercial pattern size 14 might correspond to a retail size 8-10. Always use your actual body measurements with each pattern's specific size chart—never assume your pattern size matches your clothing size.
Q: What does "RST" mean in sewing pattern instructions?
A: RST stands for "Right Sides Together," meaning you place the right (outer/pretty) sides of two fabric pieces facing each other before sewing. This is one of the most common instructions in patterns because it ensures seams end up on the inside of the garment when you turn it right side out after sewing.
Q: How do I print a PDF sewing pattern correctly?
A: First, check the test square (usually 1"×1" or 2"×2") by printing just that page at 100% scale with no page scaling or "fit to page" options enabled. Measure the printed square—if it matches the specified dimensions, your settings are correct. Then print all necessary pages at the same settings, trim margins following the guides, and tape pages together matching the assembly diagram.
Q: What's the difference between finished measurements and body measurements?
A: Body measurements are your actual bust, waist, and hip measurements. Finished measurements are the measurements of the completed garment, which are larger than body measurements due to ease. Comparing finished measurements to body measurements helps you understand how fitted or loose a garment will be when worn.