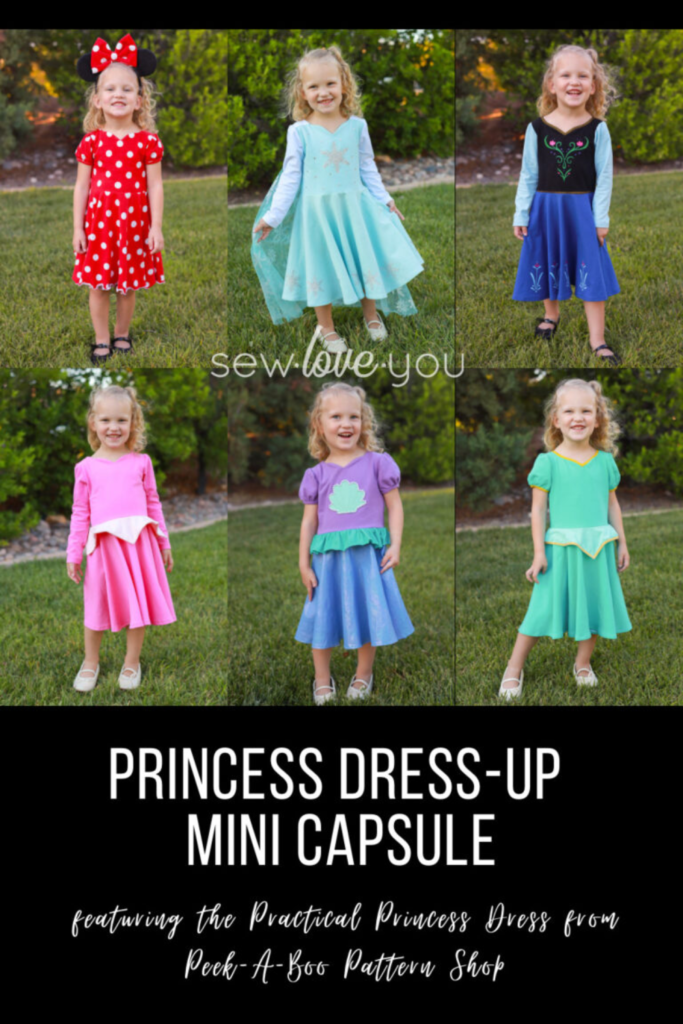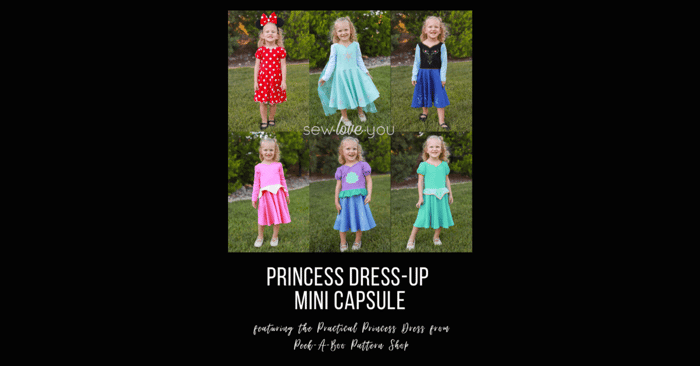
DIY Princess Costume | Practical Princess Mini Capsules
Hello sewing friends! I’m Bonnie from Sew Love You. Today, we’re sewing a DIY princess costume with the Practical Princess pattern from Peek-a-Boo Pattern Shop.
One of my favorite parts about sewing is that it has magical powers to make your kid’s dreams realities! Like many little kids of preschool age, my daughter loves dressing up as her favorite princess characters. She changes clothes multiple times a day and basically lives in dress-ups. She wanted a variety of princess clothes she could twirl in. From the Mom’s perspective, I wanted soft, comfortable dress-ups that were simple, but beautiful and could be washed over and over. I decided on the Practical Princess Dress pattern and knew we could make this mini capsule of princess dress-ups a reality!
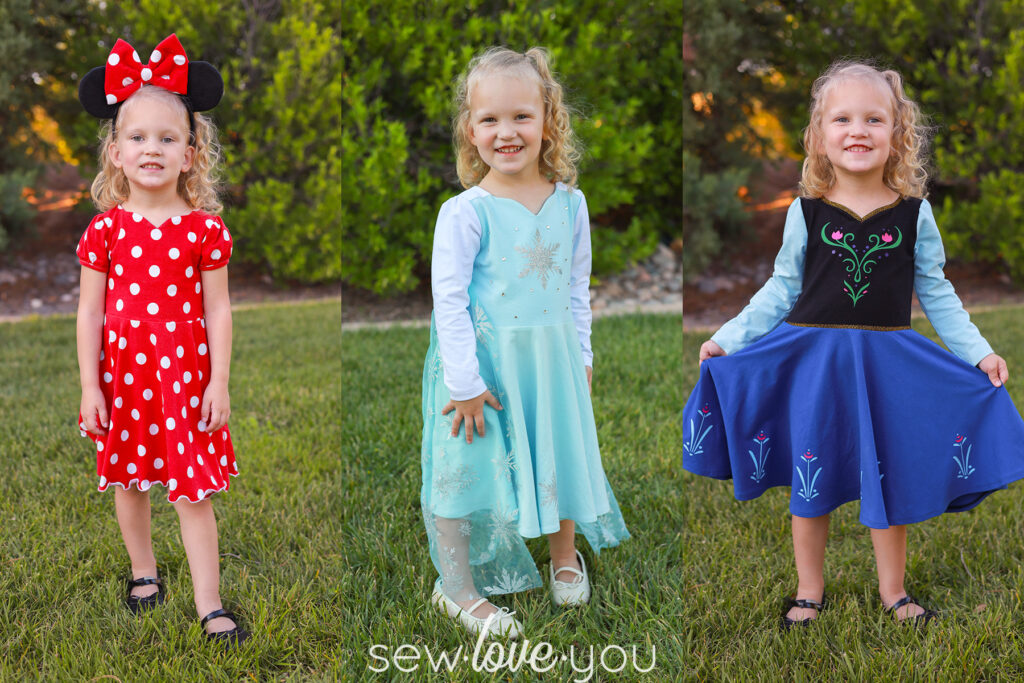
I started off deciding which characters to make for these DIY costumes. A made a list and narrowed down her favorite six. That seemed like a reasonable number. We settled on classic Minnie Mouse, Elsa and Anna, then Sleeping Beauty, Ariel and Jasmine. We may add more princesses in the future because she loves the dresses so much, but we had to cut it off somewhere for now.
 DIY Princess Costume | Drawing the Dresses
After deciding on which princess dress to replicate, I drew a simple drawing of what each character’s dress would look like. Some princess dresses were more simple and other’s escalated during the process, haha! I knew twirl was a big factor, so I was happy that the Practical Princess Dress pattern has a circle skirt. Although it uses more fabric than a traditional gathered skirt, I knew the dress would come together fairly quickly and check the box on twirl factor. I sized up one size in every dress (except Minnie) for longer wear. And I was able to squeeze most dresses out of 1 yard of fabric for a size five. The long sleeve dresses did take a little more fabric.
When I was done drawing out the dresses, I made a list of colors of fabric I would need. Some dresses used the same colors, so that helped. I used cotton lycra for the bulk of the dresses and most of the fabric I already had in my stash. That’s what a fabric stash is for, right? But if you need fabric for this project, Knitfabric.com has a great selection. Elsa did require some soft tulle, which I found at Tulletastic. I also added to the supply list any extra notions I would need. I ended up using fold over elastic, heat transfer vinyl, pearls and rhinestones.
 Sewing the Princess Costumes
I typically use my projector when cutting sewing projects, but found this time it was easier for me to use the good old paper pattern to cut out all the dresses. I did make some small pattern adjustments to Elsa and added peplums for a few princesses, but I’ll give more details of those below. Using paper patterns made it easier for me to make adjustments to the patterns as needed.
Once I gathered all of my supplies I got sewing. The Practical Princess Dress is pretty straightforward. After making it once, I didn’t need to look at the directions anymore and the assembly line sewing went fairly quickly. I love that the Practical Princess Dress pattern also has different sleeves. We used the puff sleeve and long sleeve options. Both are perfect for different princesses! Gathered sleeves, ¾ sleeves and sleeveless options are also included in the pattern. The pattern has a lined bodice, but on some of the dresses I opted to use fold over elastic at the neckline instead. That saved me some fabric, since I wasn’t using a lining.
Let’s chat about each princess dress in detail and I’ll share my tips on how I turned each dress into my daughter’s princess dream come true!
Minnie Mouse

Although not technically a “princess,” Minnie Mouse was an obvious, classic dress-up choice. She was the trial run to check fit for this pattern. I sewed up my daughter’s regular Peek-a-Boo size. It fit perfect! But I knew I wanted the dress-ups to fit for a few years, so I ended up sewing the other dresses in one size larger. You choose which size you like best!
Minnie was the easiest and quickest dress to make! The hardest part was finding the perfect Minnie fabric. Lucky for me, I had the perfect polka dot fabric leftover from when I sewed myself a Minnie Mouse Melbourne Cross Over Dress for Halloween a few years ago. The puff sleeve option was perfect for our little mini Minnie. I didn’t end up topstitching the neckline on any of my dresses that are lined, mostly as a time saver. I just ironed the neckline really nicely and they’ve held up fine. I’m sure they would look more professional topstitched, but since these are mostly for play, I opted for the quicker option.

Hemming a circle skirt can sometimes be the pits, so I opted for a lettuce hem on Minnie’s dress. I like to pull the fabric from both the front and back of the presser foot as my machine is making the rolled hem. That extra tension seems to produce the most ruffling, which my little one loves.
Elsa DIY Princess Costume
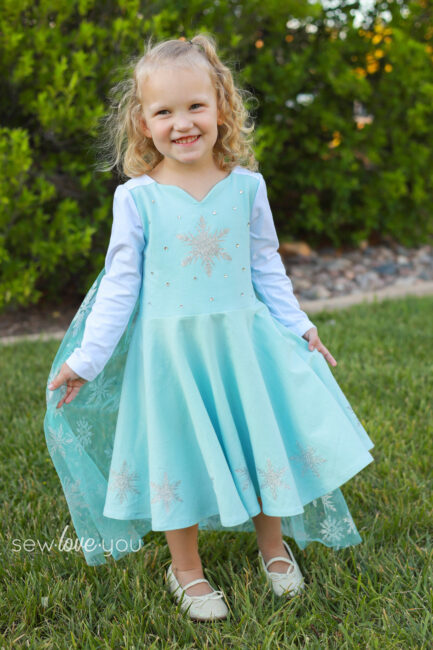
As soon as my daughter and I talked about making princess dresses, I knew her top choice would be Elsa. Frozen 1 and 2 is on repeat at our house and she can be found singing “Let it go!” and “Into the unknown” at any given moment. Elsa was definitely the most time consuming and intricate princess. And to be honest, the blue dress sort of spiraled from simple to more complex. I wanted to make it special, since Elsa is her current favorite. In the end, my toddler loved how it turned out, so it was all worth it.
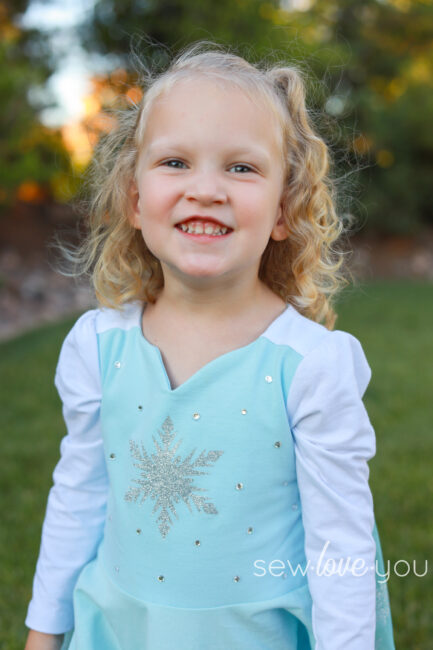
First up, I altered the bodice of Elsa. On the front bodice I cut around the collarbone at the sweetheart neckline and colored blocked it to more replicate Elsa’s dress. I used light blue and white cotton lycra. To be fair, if I did it again, I would leave this out and have the entire front of the bodice be one color. It’s not noticeable enough to make altering the pattern worth it.
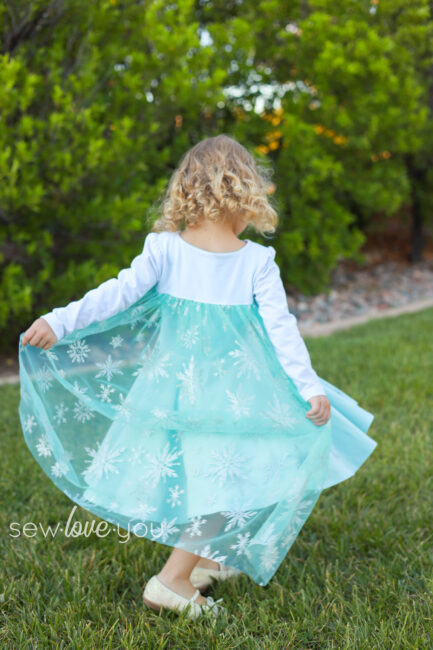
I also cut along the back of the bodice to accommodate where I needed to add the gathered tulle cape. When altering the pattern, don’t forget to add back in seam allowance. I used a ¼” on each piece where it was needed. I made new bodice pieces by tracing the original bodice piece, cut where I wanted and adding back in the seam allowance as needed.

Last, the Elsa costume needed a little more bling and shine! I glued rhinestones to the dress, which I found on Amazon. This was my first time working with rhinestones and they weren’t nearly as scary as I psyched myself out to think. I have an upcoming blog post where I’ll go into more detail about adding rhinestones to your garments.
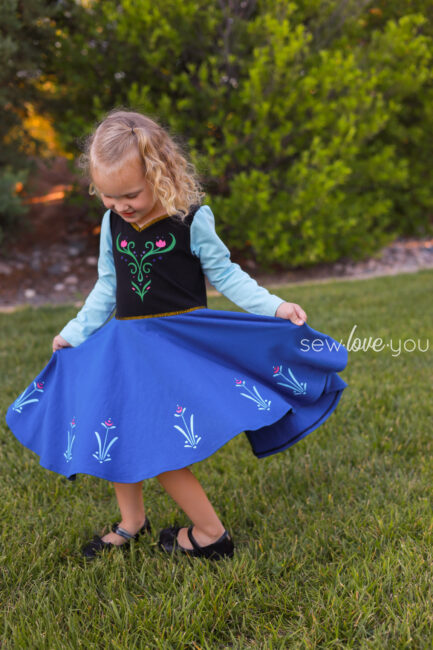
Anna DIY Princess Costume
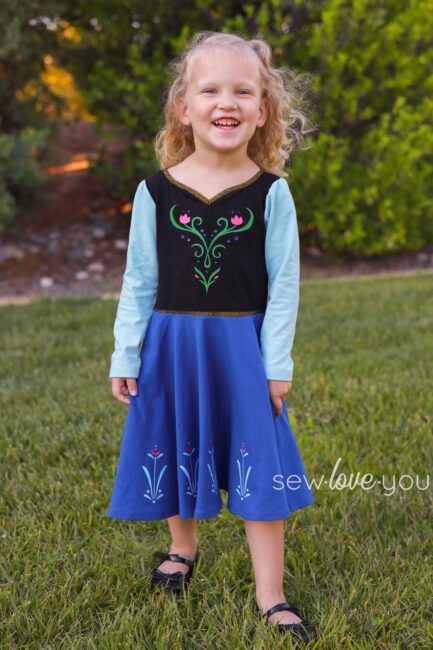
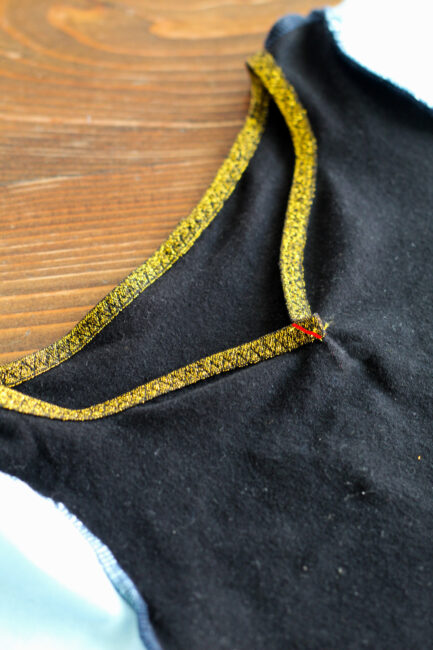
If we had Elsa, we definitely needed her sister Anna. Anna’s dress was less complicated than Elsa’s, but it sure has a few elements that help it stand out. Instead of lining the bodice of Anna, I cut one front and back bodice piece (instead of two). I also cut off ¼” of fabric along the sweetheart and back neckline on the front and back bodice pieces. I needed to take the seam allowance off since we aren’t lining it.

After sewing the shoulder seams together I added fold over elastic (FOE) to the neckline. I used this technique for both Anna and Jasmine’s dresses. You need to stretch the FOE as you sew. I would suggest practicing on a scrap piece of fabric to get the right tension. I used a zigzag stitch and went slow as I sewed. I straightened out the fabric as I sewed the corners of the sweetheart neckline. After I was done I went back and sewed a diagonal line right at the front middle of the neckline to take out the extra bulk and help the neckline line flat and correctly.
Additionally, I added FOE (this time flat) along the bottom hem of the bodice. I factored in the seam allowance of the skirt to make sure I had enough of the FOE showing when the skirt was attached. Remember to use a zig zag or another stretch here as well, since the bodice will be stretched as your child takes the dress on and off. I used my Silhouette machine and heat transfer vinyl to cut the designs for Anna’s dress. After hemming the skirt, I used my Cricut Easypress to attach the designs. One of the best parts of Anna’s dress is watching the floral design on the skirt as my daughter twirls. It’s so fun!
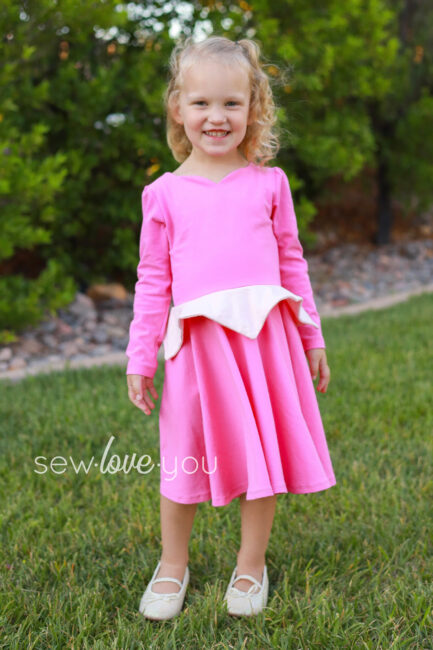
Sleeping Beauty DIY Princess Costume
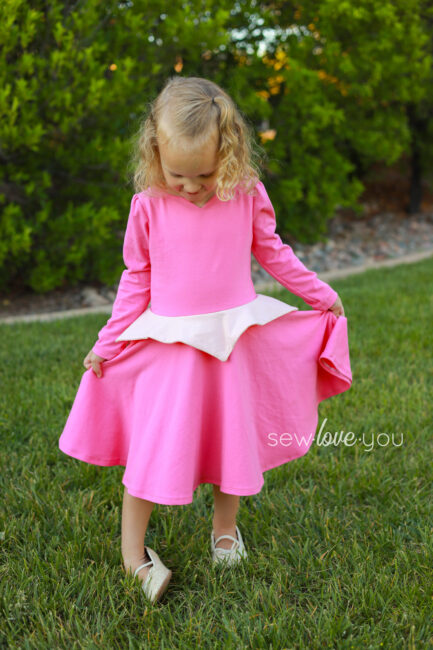
Sleeping Beauty has become a recent favorite princess around our house. I think it’s because my daughter’s favorite color is pink. I didn’t mind adding Sleeping Beauty to the list because I knew this dress would be pretty quick. Although there’s always a debate about whether or not Sleeping Beauty’s dress is pink or blue, I obviously chose pink to keep the preschooler happy. Everything is the same shade of a darker pink except for the pointed peplum, which is light pink. I used the long sleeve option which does have a little bit of gathering at the top of the armscye.
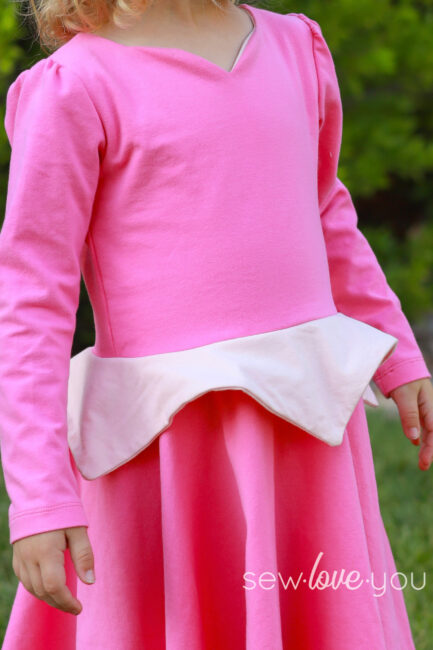
To make the pointed peplum, I used the circle skirt peplum as my base. I traced around the top of the circle skirt (where the middle of the “donut hole” will be.) Remember you’re looking at 1/4th of the circle. From each side of the pattern, I measured down 4” and made a mark.. From the middle of the pattern, I measured down 2 ½” and marked that point. From the two 4” down markings, I angled up and made a v-shape. I then blended it in as I got to the 2 ½” mark at the center of the pattern.
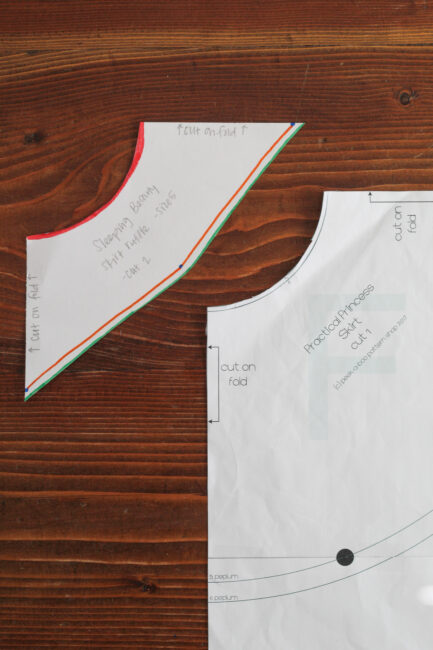
Here’s the example of my pattern piece. It may look a little funny. But remember, you’ll be cutting this piece on the double fold at each end. I marked my pattern piece so I wouldn’t forget! I chose to line this peplum, so I needed to add ¼” seam allowance to the bottom of the pattern piece. You do NOT need to add any seam allowance to the sides or top of the peplum because it’s already included in the original circle peplum piece. I then cut two pattern pieces on the double fold. I sewed the two peplum pieces right sides together along the bottom edge, flipped them right sides out and ironed.

After that you’ll sandwich the peplum in between the circle skirt and bodice and sew. Just remember to line up the points of the peplum so they are pointing at the front, back and sides. The most difficult part of Sleeping Beauty was making the peplum, but it only took a few minutes to draft the extra pattern piece.
Ariel DIY Princess Costume

Ariel from the little mermaid was definitely a trickier one. My daughter preferred to have the dress be a mermaid look, rather than the pink dress Ariel wears when she becomes human. Mermaid scale fabric would have been ideal and perfect! However, I was trying to use fabric I already had in my stash. The dresses were also for my daughter’s birthday and I didn’t want to wait for fabric to ship. I found a cotton woven fabric in my stash that has a little bit of shimmer to it and reflects different colors depending on the light, slight blues, greens and purples. This is the only skirt that is woven in the collection. I will admit that it is slightly annoying because the skirt wrinkles easier than the other skirts made from cotton lycra, but my daughter doesn’t seem to notice or care.
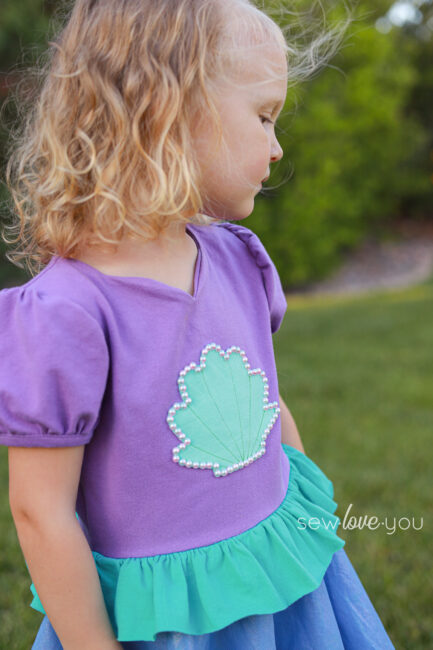
I decided to add an applique shell to the bodice for that mermaid look. I found a seashell image online and traced it onto a scrap piece of mint fabric that was backed with knit interfacing. I then sewed the seashell to the bodice. I found it easiest to add the applique to the bodice before you sew the neckline and add the lining. I added my applique first before I sewed the shoulder seams. A reminder to not put your appliques too close to the bottom of the bodice. There will be ½” seam allowance when the skirt is added and you don’t want your applique to get caught in the skirt and cut off.
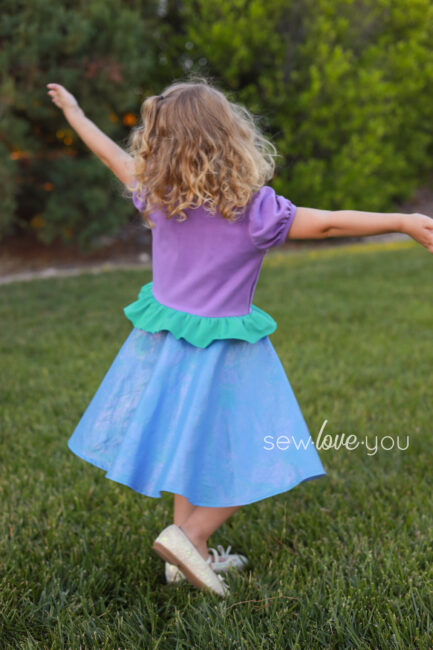
To make the skirt look more like a mermaid, I add a little peplum ruffle at the waistline. I measured the width of the bodice front and doubled it. I cut two pieces of fabric that width (one for the front and back). I guessed on a length for the ruffle peplum, factoring in the seam allowance that would be needed when I attached the skirt to the bodice. I ended up with a length of 3”. After sewing the ruffle pieces right sides together on each short end, I gathered the long circle and matched up the side seams and front/backs of the bodice to make sure the gathers were evened out. I then sandwiched the peplum between the circle skirt and bodice and sewed through all the layers. I didn’t hem the ruffled peplum, although you could definitely do a rolled hem.
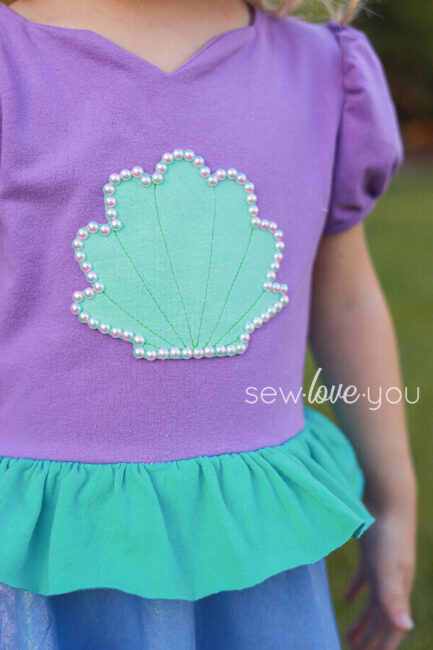
At this point the top of the Ariel bodice definitely needed something fun! We decided adding flat back pearls would definitely help this dress feel like it was meant to be under the sea. I will have an upcoming blog post about how I added the pearls to this dress. It is the same technique as Elsa’s rhinestones.
Jasmine DIY Princess Costume
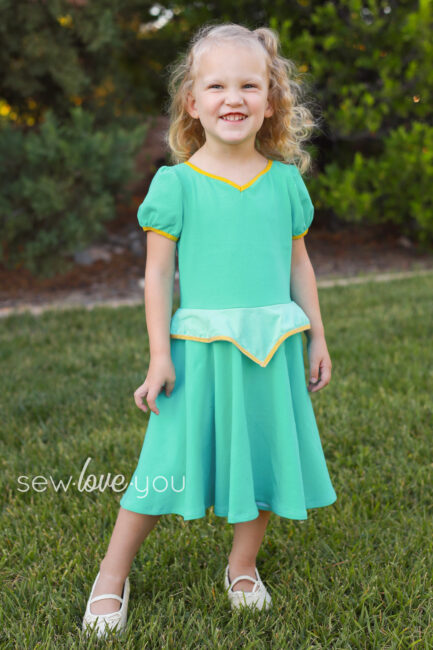
Jasmine is our last princess. Although a romper would have been a perfect choice for Jasmine, we decided a twirly dress was just as fun! Jasmine is very similar to the Sleeping Beauty gown except I chose puff sleeves instead of long and her neckline is similar to Anna’s. Most of Jasmine is a teal color, but her peplum is a mint color.
Jasmine’s sweetheart neckline without a bodice lining is the same as Anna’s. I chose a glitter fold over elastic that I found on Amazon, but you can find fold over elastic (FOE) many places. Remember if you’re using FOE on the neckline you only need to cut the front and back bodice pieces once, since you’re not lining it. And I reduce the entire neckline by ¼” to remove the seam allowance since you’re not lining the bodice.
This time I additionally added FOE instead of arm binding. I was a little worried how well this would work since FOE is usually pretty small in width and there are a lot of gathers at the bottom of the sleeve. But I just went slow and used a zigzag stitch. It worked great!
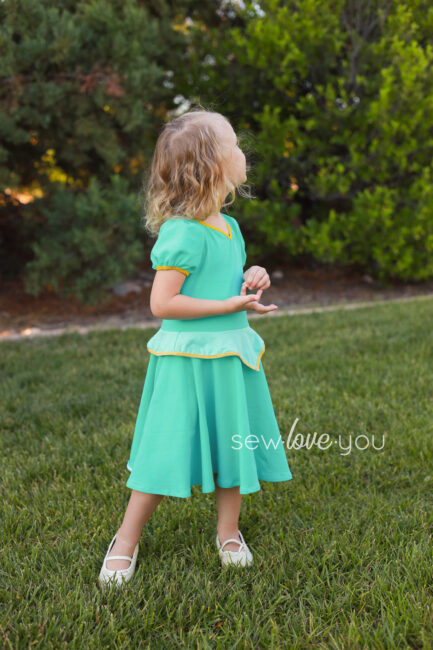
Jasmine’s peplum is very similar to Sleeping Beauty’s. The only difference is you want a pattern piece that has one point in the front. To make this easier on myself, I decided to make two half circle pieces to work with instead of a 1/4th of a circle piece like Sleeping Beauty’s and the original circle peplum pattern piece. I made sure the point was on one side and the rest of the pattern piece was just 2 ½” all the way around. Because I decided to make two pattern pieces this time, I did need to add ¼” seam allowance to the side edges of the pattern piece (which will be the sides of the peplum). I didn’t line Jasmine’s peplum like I did Sleeping Beauty’s and therefore didn’t need to add any seam allowance at the bottom of the peplum.
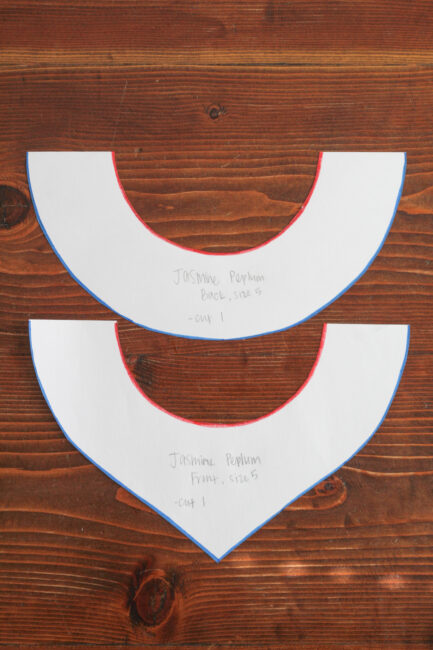
Here’s an example of what Jasmine’s peplum pieces looked like. I sewed the two peplum pieces right sides together at the side seams and then sandwiched the peplum between the bodice and skirt pieces. At this point I added FOE to the hem of the peplum. I started on the point and gently pulled as I went around the circle. Remember to practice the tension on a scrap so you aren’t pulling too hard or too soft. And that was it! I like how the glitter FOE adds a little sparkle to this possibly simple dress.
So there you have it! All my tips and tricks to use the Practical Princess Dress to make your little one’s fairy tale dreams come true. There’s endless options to this pattern. And I know with a few little tweaks you can have a “happily ever after” at your house too!
 Thank you so much for joining us today to learn about how to make a DIY Princess Costume with the Practical Princess Dress. Top off the outfit with a crown, necklace, tiara, apron or other accessory to make the perfect DIY Halloween Costumes.
Can I Use This Process to Make Other Princess Costumes?
Of course! You could use the practical princess to make so many more DIY Disney Princesses. You could make a Belle costume, Cinderella costume, Mulan costume, Snow White costume costume, Rapunzel costume, Princess Tiana costume, or many more for your little girl.
Before you leave, make sure to join our Facebook Group or follow us on Instagram or Pinterest. Happy sewing!