A Beginner’s Guide to Upcycling Clothes
Upcycling clothes is an eco-friendly way of refreshing your wardrobe and at the same time helping the environment by cutting down on textile trash. In simple terms, upcycling involves remaking old clothes, fabrics, tablecloths, or any other textile-based items with wear and tear into something new, wearable, and unique.
This article will provide you with a starting point for your exploration of the upcycling world and its numerous options for updating your wardrobe.
In addition to techniques, sewing methods, and project photo inspirations, we are including a step-by-step tutorial on how to create a denim jacket with knitted sleeves using clothes that are already in your wardrobe.
Upcycling Clothes vs recycling: What’s the difference?
By putting in use creative sewing and non-sewing methods, a new life and a second chance are given to clothes and textiles. This is the beauty of upcycling.
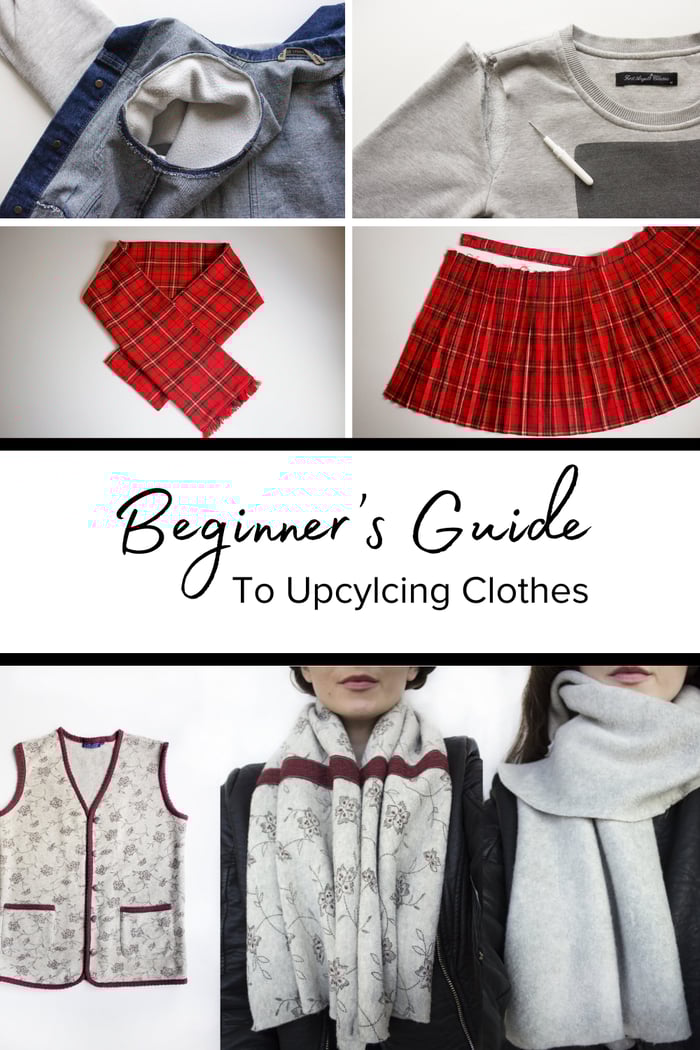
For example, a clever idea to transform a not-so-stylish fleece vest into one of a kind double-sided fleece scarf.

On the other side, recycling involves the breaking down of used and unwanted textiles into fibers. These fibers then are used to create new textile products. Recycling has its own important role in minimizing the demand for raw fibers but at the same time during this process resources such as water and energy are consumed.
What are the benefits of upcycling clothes?
Upcycling clothes and textiles encourages creativity while at the same time reducing textile waste. Upcycling as a process takes work and dedication but it contributes to extending the life of unwanted textiles and clothes that have a lot of potential but for many reasons are not being worn.
In addition, repurposing your old clothes is wallet-friendly, as is a fraction of the cost comparing it with new clothes, and promotes a more sustainable shopping approach.
Upcycling your clothes: Getting started
When it comes to upcycling, it's hard to say where to begin because there are so many different ways to get started and so many opportunities to create something original.
We've outlined some essential steps you should consider below if upcycling your clothes is in your future.
FIBER CONTENT - Start with defining the fiber content but also the quality of the garment you’re planning to upcycle. Aim to select clothes that have potential but also space for creative transformations.
UPCYCLING TYPE - Does your garment need a full transformation, or does it only have wear and tear that needs to be mended? Sometimes it’s difficult to decide which is the best option but trust your gut and go with it.
MAKE A PLAN - Make a detailed plan before cutting into the garment. Choose an idea and assess if you have enough to remake the garment that you want. The good side of upcycling is that you can combine as many garments as you need to bring your vision to life. In addition, take your time don’t walk away just because you don't have a good idea at that moment. Creativity as we know usually strikes when you least expect it.
HARDWARE AND NOTIONS - Define if you have all of the tools to repurpose that garment. For example, are you hand sewing or using a sewing machine? In the case a no-sew method is involved you for sure will need an iron or hot glue. If the garment being upcycled had buttons, trims, or zippers try to save them and use them for another project.
REMEMBER: THE SEAM RIPPER IS YOUR BEST FRIEND WHEN UPCYCLING! USE IT WISELY.
Sewing methods
Embroidery, crochet doilies, lace appliqué, beading, and sashiko stitching are some of the simple ways to add personality to a garment that may not require much work but needs something to take it to the next level.
For example, crochet doilies are the perfect pieces to hide imperfections or if any part of the garment has a tear or a hole. For example, the back of this linen shirt had a tear and with some very easy steps, it was transformed into a new piece with more character.


Sashiko stitching is another great way to add depth to your clothes. It comes in handy especially when there are sections on the garments to be mended but also as a decorative stitch.
In the example below, denim fabric scraps have been assembled together and sashiko stitching was embroidered on the assembled panel which was attached to a basic tote bag.

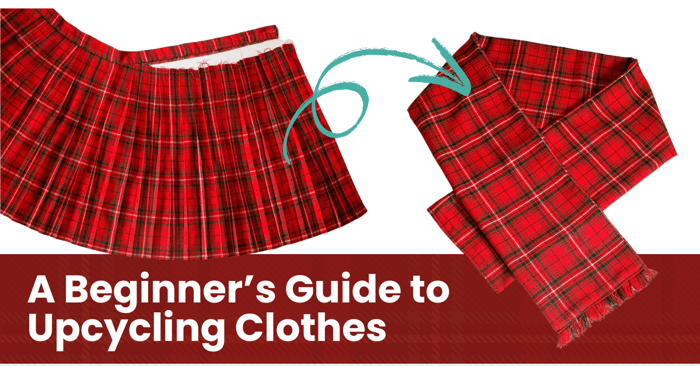
Making a scarf out of a plaid skirt is another example. The tools needed for this simple upcycling project are an iron, scissors, needle and thread, and a seam ripper. This skirt did not fit well and had sentimental importance, so it was turned into a scarf.


No-sew methods
In addition, techniques such as tie-dye, bleach-dye, but also natural textile dyes can give another way of repurposing if sewing is not your thing. Select clothes to be dyed based on their fiber content. For example, natural fibers such as cotton and linen take the dye very easily but if the case is a poly blend the fabric probably won’t take the dye as it should.
I have experimented a lot with natural dyes using avocado seeds, turmeric, beets, and indigo and the results are always astonishing and really give clothes a revamp and a sense of uniqueness.
For example, dyeing with avocado pints can give a variety of shades such as peach pink, and salmon.

Now let’s dive into a very simple upcycling tutorial that is beginner-friendly and so fun to make.
Denim Jacket with Knitted Sleeves Tutorial
This jacket can be made using a denim vest or a denim jacket. If you have a denim jacket that you adore but the sleeves are too short or worn out, you may surely salvage the jacket by adding knitted sleeves.
In the tutorial below I used a denim vest since it was not being worn at all and having a jacket with knitted sleeves was always on the list.
TIP: Ideally choose a denim vest/jacket and a sweatshirt around the same size. This is extra helpful to set in the sleeve into the vest’s armhole. If the sleeves are bigger than the armhole, you’ll have to take them in.
Materials & tools you'll need
Tape measure
- Sewing pins
- Scissors or rotary cutter
- Thread
- Chalk
- Seam ripper
- Sewing machine

Using a seam ripper, rip and carefully remove the sleeves from the sweatshirt. Remove the remaining thread around the sleeve’s cap. Depending on how much seam allowance is built into the sleeve, keep in mind that you will need at least 1 cm (3/8 inch) to set the sleeve in the denim vest. Using a marker or chalk mark the back and the front of the sleeve.

Turn the vest on the wrong side and pin the sleeve around the armhole (right sides facing together). Align the underarm seam and pin in place, and then align the rest of the sleeve and pin in place. Sew all around the armhole preferably using a denim needle.


- Repeat for the other sleeve.
Use a serger or a zig-zag stitch to finish the raw edges around the armhole.
TIP: If you’re unsure about how the sleeve fits into the vest, hand stitch it first and see if the fit is to your liking, and then proceed with sewing in the machine.
TIP: Denim jackets and vests are usually made using heavyweight denim, so for this project, a good denim needle is needed to secure the stitches well and to achieve a smooth finish.
Tips for successful upcycling
- Always look for inspiration from others. Enjoy scrolling down Pinterest or Instagram to find ways you can transform your garments.
- When just starting to upcycle, practice your skills on clothes that don’t have sentimental value for you. After some tries, you’ll become confident enough to upcycle your valuable pieces.
- Be patient if a project is not working out and try to use a different approach. We have all been there stuck with a project or out of inspiration.
- When using a sewing machine for your upcycled project, try to match the thread and the needle with the chosen garment. The final upcycled garment always turns out way better if you’re applying the basic rules of sewing.
- Iron all your garment pieces before diving into upcycling, since cutting and marking will be so much easier.
Final thoughts on upcycling clothes
To sum up, upcycling clothing doesn't have to be difficult. Take it slow by using a needle and thread or by avoiding sewing altogether and concentrating on projects that don't require sewing.
Repurposing your existing wardrobe not only helps you move closer to sustainable fashion but also allows you to show off your individuality and personal style.
Thank you for joining us today to learn more about upcycling clothes. Before you leave, make sure to join our Facebook Group and follow us on Instagram. Happy Sewing!
 Upcycling Clothes