Zig Zag Stitch | Sewing 101
One of the most versatile and useful stitches is the zigzag stitch. It is widely used for finishing raw edges, mending, hemming, gathering fabric decorative stitching, making buttonholes, and more.
The majority of modern sewing machines have a zigzag stitch and offer various modes to adjust the width and stitch length. But in the case you’re working with an old mechanical sewing machine then the chances are you may not have one.
Learn the fundamentals of the zigzag stitch in this article, along with a step-by-step guide on how to use it to finish raw edges on fabric, create a buttonhole, and see examples of other uses for this versatile stitch.

Where to use the Zig Zag Stitch
Given the many potential uses for the zigzag stitch, we are providing some suggestions below in case you need inspiration or don't have a certain sewing foot.
- Finish raw edges
- Create a lettuce hem
- Make a buttonhole and sew buttons
- Use when sewing with stretch fabrics
- Mending jeans
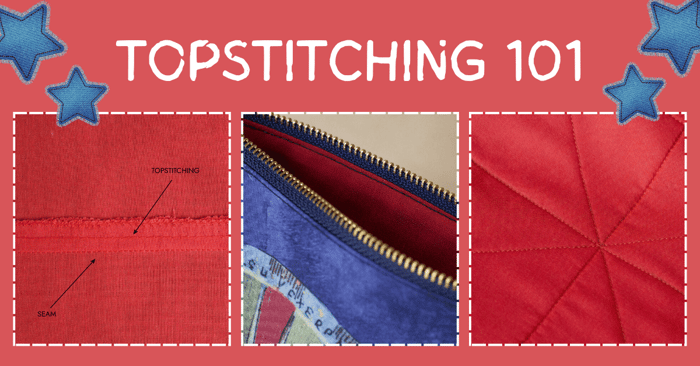
- Use it as a decorative stitch on pockets or as a topstitch on garments
- Hemming knit shirts
- Gathering fabric
- Sewing elastic ends in place
- Sewing trims and laces on garments
- Bar tacking – use it to reinforce certain seams
Zigzag stitch on woven fabrics
For medium to heavy-weight woven fabrics, a suitable needle and high-quality thread can do wonders when used in the zigzag stitch.
On lightweight fabrics, zigzag stitches might not be the best option, particularly if the width is on the bigger side. This causes rolling inside or bunching up because the fabric is not thick enough to hold the stitch's width. To achieve a neat and stable stitch, it is recommended to either zigzag 1 cm (3/8”) away from the raw edge of the fabric or use a stabilizer when possible. However, this technique will still need you to trim close to the zigzag stitch.
Zigzag stitch on stretch fabrics
The zigzag stitch comes in handy when you don’t have a serger, but still want to sew with stretch fabrics. The zig-zag stitch allows the stitch to stretch with the fabric, thus eliminating thread breakage in specific areas due to wear, wash, and stress.
Take into consideration that when using a zigzag, especially with a short width such as in knit fabrics, it’s not possible to press the seam open, instead, the seam allowance is pressed to the side.
Overcasting Zigzag
An overcasting zigzag stitch is a special type of zigzag stitch and is used to wrap the thread around the edge of the fabric to finish the raw edge. But it can also be used to sew knit fabrics together. It is an excellent alternative for finishing seams professionally without a serger.
While the overcasting zigzag stitch is compatible with a wide range of fabrics, it may not be suitable for all fabric types. It is ideal for thicker fabrics like denim, but it may not work well with thin fabrics. Therefore, it is essential to test the stitch on scrap before using it on the actual project.
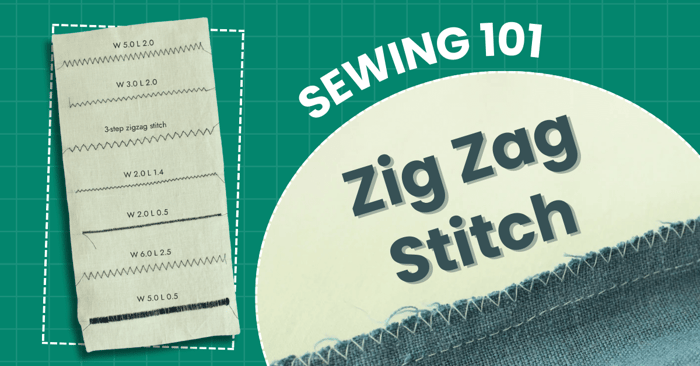
Stitch length and width
The zigzag stitch width and length can be adjusted to change the desired appearance of the stitch. The length is the distance between the stitches, and the higher the length, the zigzag is longer. On the other side, the width indicates the width of the stitch, and the higher the number the zigzag is wider.

Examples of various zigzag stitch lengths and widths

Presser foot choice
The all-purpose foot is a good place to start, but there are other alternatives as well. Occasionally, using satin or appliqué feet simplifies the process because these feet are constructed of transparent plastic or feature an opening that allows you to see the stitching process clearly.
Adjusting tension
If the tension is not right, the zigzag stitch may not end up as neat as you like but also pucker and break. This is where we say again that it’s always best to test out first, then proceed with your project if all the settings are correct.
How to zigzag stitch fabric raw edges
- Depending on the project you can finish the seam allowance together, or open the seam, pressing and finishing each raw edge separately.
- When finishing seam allowances together stitch the seam, trim down to 1 cm (3/8”), and press. Set your machine to the zigzag stitch setting. Select your chosen length and width. For example, 2.4-2.5mm length and 3-3.5mm wide work well with most woven fabrics. Feel free to experiment as you sew to see how different zig zags look at different widths and lengths.

Zigzag both layers of fabric together for a neat finish.

If fabric edges are to be finished separately, then apply the zigzag stitch along each edge first. Apply a zigzag stitch at about 0.5- 1 cm (1/4- 3/8”) away from the raw edge on both fabric panels.

Place both fabric panels together with the right sides facing together and align the zigzag stitches. Secure with pins and sew the seam at the designated seam allowance.

- Press the seam open. Trim the raw edge excess fabric close to the zigzag stitch while being careful not to cut the stitches.


Note the difference between zigzagging both fabric layers together and zigzagging them separately.
 Zig Zag Stitch
How to create a buttonhole with the zigzag stitch
Not all nowadays sewing machines come with a buttonhole foot, and if yours does not have one then you do not have to worry since we have you covered.
Besides making one by hand, there’s an easier way to do it using the zigzag stitch. Depending on your project and the fabric type, keep in mind to always interface the fabric you’re working with. This extra structure added to the fabric will help the stitches to stay flat and strengthen and stabilize the area especially when working with lightweight fabrics.
Take into consideration that it may take several times and different settings depending on the sewing machine you have to nail this method. But, testing and practice are the key to sewing a good buttonhole with a zigzag stitch.
Measure your button. The diameter of the one in the picture is 15 mm.

Apply fusible interfacing to the wrong side of the fabric where the buttonhole will be placed.
Determine the placement of the buttonhole on the fabric. Using a ruler and a pencil draw a line diameter of the button + 3 mm = 15 mm+ 3 mm= 18 mm long.

Perpendicular mark on both ends of the line. These lines will come into help to decide where to start and stop the stitch.

Next, set the sewing machine to a zigzag stitch. Adjust the width and length of the stitch according to the buttonhole size. Generally a width of 2.0-3.0 and a length of 0.4-0.6 works well for most buttholes. But you still must test to find the ideal numbers for you. With these settings, the zigzag stitch turns out very dense, you may have to adjust the tension too.

Start to stitch on the left side of the center line (close to the line but not on it). Sew and guide the fabric slowly up to the end of the marked line.

Ideally, keep the needle down and raise the presser foot. Turn the fabric around, raise the needle up, and reposition it close to the center line. Stitch the second zigzag close to the seam line up to the end of the marked line.


Next, the zigzag seams need to be reinforced on both sides with bar tacking. Bar tacks keep the buttonhole in place and ensure stability when the hole is cut open. To sew a bar tack, increase the width of the zigzag stitch and shorten the length. Set the width to approximately 5.5 and the length to 0.0-0.2.

Start sewing slowly and bar tack 4- 6 times. Make sure to cover both ends of the buttonhole with bar tacking. Repeat for the other side of the buttonhole.

Pull the threads to the wrong side of the fabric, knot, and trim the excess thread.
Open the buttonhole using a seam ripper or some small sharp scissors. Make sure to not cut through the zigzag stitches or the bar tacks while opening the buttonhole.

Final thoughts on zigzag stitch
As you can see the zigzag stitch is a versatile stitch that can be used in different ways to help functional garments or details on garments. In addition, it’s one of the most important stitches especially when all you have is a sewing machine and you’re missing a serger.
Thank you for joining us today to learn more about the zig zag stitch! We hope we've given you some inspiration. If your still searching for inspiration, then make sure to join us on Instagram, join our Facebook Group, or sign up for our e-mail newsletter below. Happy Sewing!