How to Sew a Shirt Collar | Sewing 101
Learning how to sew a shirt collar is a little bit beyond the basics, but at the same time, when provided with the right tools and instructions, it’s easily achievable by even beginners.
In this comprehensive guide, we will explore everything you need to know about shirt collars, beginning with their anatomy and the various types available. We will also provide a step-by-step tutorial on how to sew a basic collar with the provided pattern pieces.
Every once in a while, you need some kind of project to get you out of your comfort zone, to try new techniques, and to develop your skills. Learning how to sew a shirt collar for the first time might be just the project.
Shirt collar anatomy | How to Sew a Shirt Collar

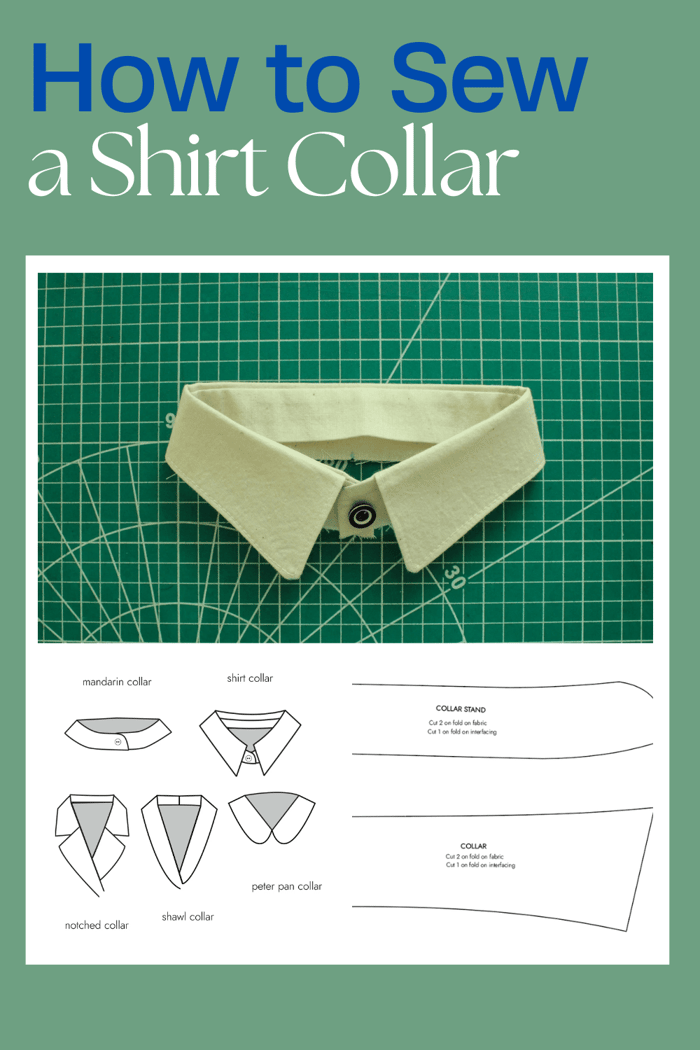
Collar types
Nowadays, there are different types of collars used in garments. In addition to serving a decorative purpose, the collar was originally designed to protect the neck while also adding style.
Find below some of the most used collar styles from which other styles and designs can be developed.
The Stand-Up Collar also known as the mandarin collar is a narrow band that stands up from the neckline. This collar is a simple band that can be overlapped at the front or not, depending on the choice.
The Shirt collar is the most common type of collar seen on men’s and women’s garments. It consists of a collar and a collar stand piece. For this style of collar, a top, a bottom collar, and a stand is cut. In some cases, both the collar and the stand are joined and cut as one.
The Peter Pan collar has curved edges compared to a sharp point and does not include a collar stand.
The Shawl collar is mostly seen on coats, jackets, and dresses. This type of collar is usually an extension of the bodice front piece and that needs to have a facing and be interfaced so it lays flat and neat.
The Notched collar has a V-shaped cut-out where the collar and a lapel join. Similar to the shawl collar, this collar style can be found on suit jackets, coats, dresses, and more.

The basics of a collar shirt
Interfacing
Interfacing is a must when sewing collars since it impacts the final look, and it needs to be there to provide that extra structure for the collar to roll smoothly. Depending on the finish you want to achieve, you can choose between a softer collar look or a crisper one.
For the first one, aim for lightweight interfacing, and for a crisper look, make sure to choose interfacing with a similar weight as the fabric you’re working with. To minimize bulk, most sewers advise trimming the seam allowance from the interfacing. Personally, unless I'm using a medium-weight interfacing, I always leave the seam allowance on.

Which sides of the collar to interface?
Most patterns call for interfacing the upper collar only and both collar stands.
In the case you’re working with a sheer fabric, then adding the interfacing to the upper collar would make sense since it helps to hide the seam allowances from showing through the fabric.
Some sewists believe that interfacing the bottom collar (under collar) adds structure and strength to the whole collar while the top collar remains neat and looks similar to the rest of the shirt.
With practice, you will come to define and decide what’s the best choice. In this case, there are no strict rules on which layer to apply, but it’s definitely more about what works for the sewist.
How to sew a basic shirt collar
There are several ways to attach a collar to a shirt, but today you’re going to learn the traditional method.
The file below contains two pattern pieces: the collar and the collar stand. This file was created for the purpose of testing and practicing the sewing of a collar.
Even so, these pattern pieces can be easily adjusted and added to any potential project you may have in mind.
Download the pattern pieces HERE.
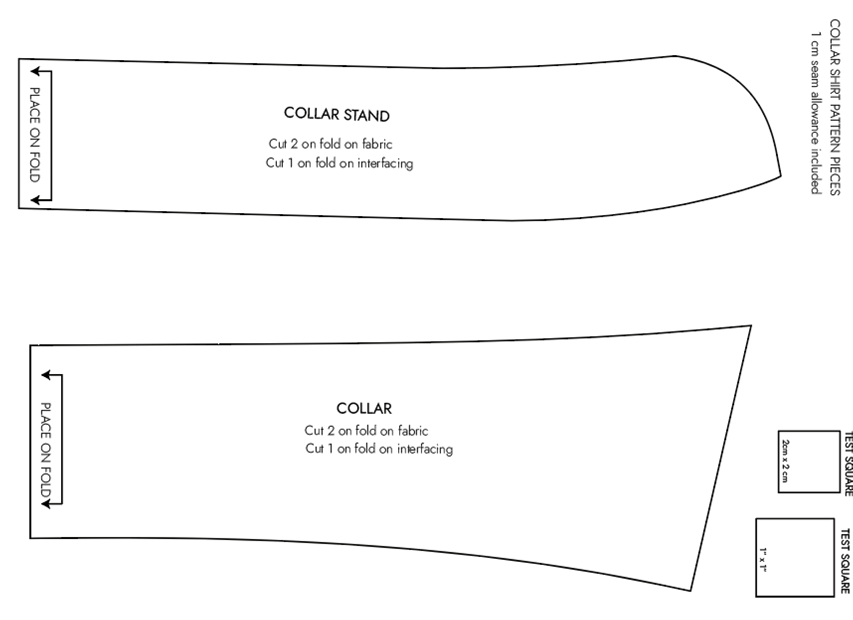
Cut two collars on the fold on the main fabric and one on the interfacing. Cut two collar stands on the fold on main fabric and one on the interfacing.

Apply fusible interfacing to the wrong side of one of the collar pieces, and one of the collar's stand pieces.

Mark the center lines for each pattern piece, for better alignment.
Pin the upper collar and under collar right sides together and stitch around the outer edges of the collar using 1 cm (3/8”) seam allowance.

Mark the collar points on the top collar as this helps to know where to stop sewing on one edge and continue sewing the other edge.

When stitching the collar points, instead of pivoting on the point, take one or two short stitches across each corner. This provides strength at the tip of the collar but also helps collar points to look symmetrical on the right side.

- Trim the collar points so they turn and lie smoothly. Press before turning the collar right side out. Trim the seam allowances parallel to the stitching lines first, grading one layer narrower than the other to reduce bulk.


Turn the collar right side out and press. Use a sharp and dull tool to bring the points out (a chopstick).

Topstitch at the edge or 0.3 cm (1/8") inside the edge of the collar to keep all layers in place and to help hold the under collar in place.

Fold the bottom edge of the interfaced collar stand piece to the wrong side by 1 cm (3/8'').

Sandwich the collar in between the two collar stands with the right side together. The interfaced side of the collar should be touching the interfaced side of the collar stand. Secure in place with pins. If you’re trying to sew a collar for the first time we suggest basting instead of pins. This way there will be no shift between the layers.


Mark the stitching line on the curved ends before sewing, to serve you as a guide and also do a consistent curve when you're sewing.

Press and trim close to the collar stand curves. Avoid making notches on the curved ends of the collar stand since trimming close to the stitching line gives a tidier result.

15. Turn the collar stand on the right side and press it away from the collar.

 TIP: Start practicing only the attachment of the collar to the collar stand. When you feel more confident then proceed to attaching the collar to an actual shirt.
To attach the collar to a shirt, proceed with the below steps:
- Pin the right side of the collar stand (without interfacing) with the right side of the garment. Stitch from one end to the other using 1 cm (3/8”) seam allowance.
- Next, take the other collar stand (the one with interfacing) and fold it over to the inside of the shirt to enclose all the raw edges. Pin in place or baste.
- Start stitching at the center of the collar stand. Stitch about 0.3 cm (1/8”) from the folded edge. Continue stitching around the collar stand.
- Give the collar a final press!
TIP: Start practicing only the attachment of the collar to the collar stand. When you feel more confident then proceed to attaching the collar to an actual shirt.
Extra tips for sewing collars
- Cut precisely and transfer any marking from the pattern pieces on the fabric. For example, it’s very important to mark on fabric the center of the collar and collar stand for each piece that is cut, as well as the center on the neckline where the collar is to be attached. This way, you can ensure that the collar is attached to the center.
- Don’t skip interfacing, especially when working with lightweight or sheer fabrics. Interfacing provides that extra structure to the collar.
- Use high-quality interfacing that does not wrinkle the fabric once is fused.
- Press after every step to ensure a neat and professional collar.
Final thoughts on sewing shirt collars
When it comes to sewing collars, it may sound like a lot of things to consider and details to perfect, but once you've put them into practice, you may find that each time it gets easier.
Sewing the perfect collar takes time and patience, and that’s why we have provided you with a guide so you can learn the basics and then take things to the next level. Do not be discouraged by the complexity of the shirt collar since there are always ways to simplify.
You can skip the collar altogether and sew a shirt only with the collar band, known as a mandarin collar. Certain shirt designs have only the collar without the need for the collar stand. The raw edges on these collars are finished with bias binding.
Thank you for joining us today to learn how to sew a shirt collar! Before you leave, make sure to sign-up for our newsletter below. You can also join our Facebook Group or follow us on Instagram. Happy Sewing!