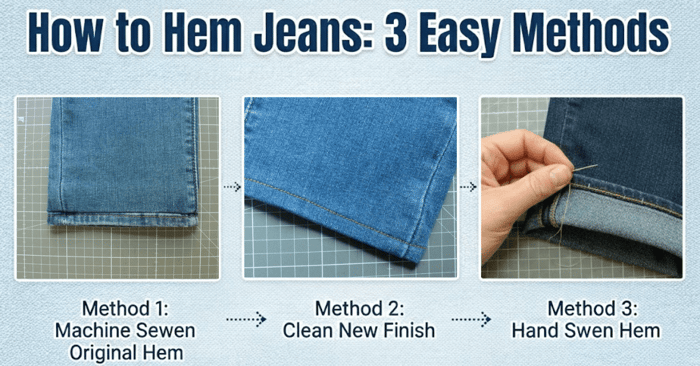
How to Hem Jeans: 3 Easy Methods
Table of Contents
- Quick Comparison: Which Hemming Method Is Right for You?
- What You'll Need to Hem Jeans
- Understanding Jean Anatomy (Quick Reference)
- Choosing the Right Sewing Supplies
- Method 1: Machine-Sewn Original Hem (Keep the Authentic Look)
- Method 2: Traditional Machine-Sewn Hem (Clean New Finish)
- Method 3: Hand-Sewn Hem (No Sewing Machine Needed)
- Method 4: No-Sew Options (Quick Temporary Fix)
- Essential Tips for Perfect Jean Hems Every Time
- Common Problems When Hemming Jeans & Solutions
- When to Use Each Method for Hemming Jeans
- Ready to Make Your Own Pants?
- When to Take Jeans to a Professional Tailor
- Final Thoughts on How to Hem Jeans
- Related Articles You'll Love:
- FAQs
Learning how to hem jeans is one of the most practical sewing skills you can master. Bought jeans that are too long? You're not alone. Whether you're short, between sizes, or shopping in the men's section for better pockets, knowing how to hem jeans saves money and gives you the perfect fit every time.
In this guide, you'll learn:
- 3 proven methods to hem jeans (machine, hand-sewing, and no-sew)
- How to preserve the original distressed hem
- Professional tips for hemming thick denim without bulk
- Common mistakes and how to avoid them
Time needed: 20-45 minutes per pair
Skill level: Beginner-friendly
Quick Comparison: Which Hemming Method Is Right for You?
Before you start learning how to hem jeans, it helps to understand which method works best for your situation:
| Method | Time | Best For | Durability | Difficulty |
|---|---|---|---|---|
| Original Hem (Machine) | 30-45 min | Keeping authentic look, designer jeans | Excellent | Intermediate |
| Traditional Hem (Machine) | 20-30 min | Clean finish, lightweight denim | Excellent | Beginner |
| Hand-Sewn Hem | 45-60 min | No sewing machine, delicate control | Very Good | Beginner |
| No-Sew (Hem Tape/Glue) | 10-15 min | Quick fix, rentals, temporary | Fair | Very Easy |
What You'll Need to Hem Jeans
Essential Supplies:
- ✂️ Fabric scissors or rotary cutter
- 📏 Measuring tape or ruler
- 📍 Pins or fabric clips
- ✏️ Fabric marker or chalk
- 🧵 Thread (color-matched to jeans)
- 👖 The jeans to be hemmed
For Machine Sewing:
- Sewing machine
- Denim/jeans needle (90/14 for medium, 100/16 for heavy denim)
- Heavy-duty thread (optional, for topstitching)
For Hand Sewing:
- Hand-sewing needles (sharps)
- Thimble (recommended for thick denim)
For No-Sew Method:
- Hem tape OR fabric glue
- Iron
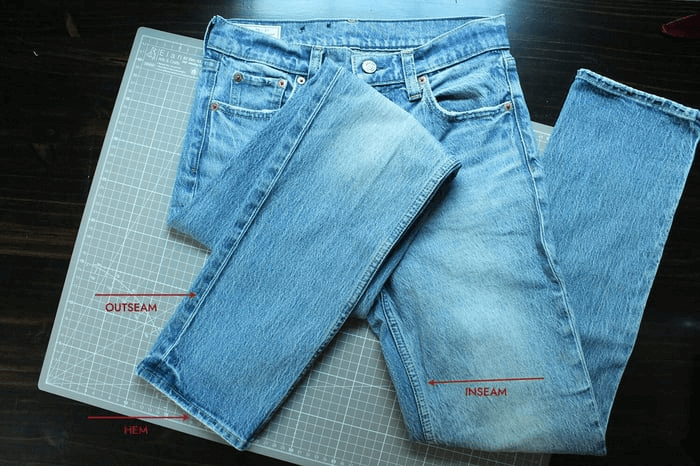
Understanding Jean Anatomy (Quick Reference)
Before you learn how to hem jeans, here are the key parts you need to know:
- Inseam: The seam running down the inside of the leg (this is where you measure length - "32-inch inseam")
- Outseam: The seam on the outside of the leg
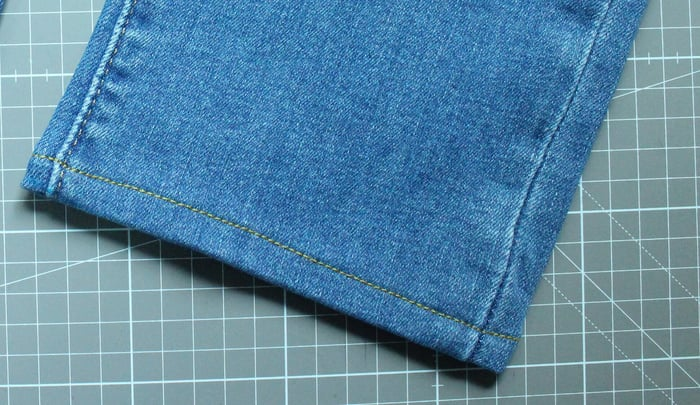
- Original hem: The factory-finished bottom edge with topstitching and distressing
- Hem allowance: The extra fabric folded under to create the new hem
Choosing the Right Sewing Supplies
Needles Matter!
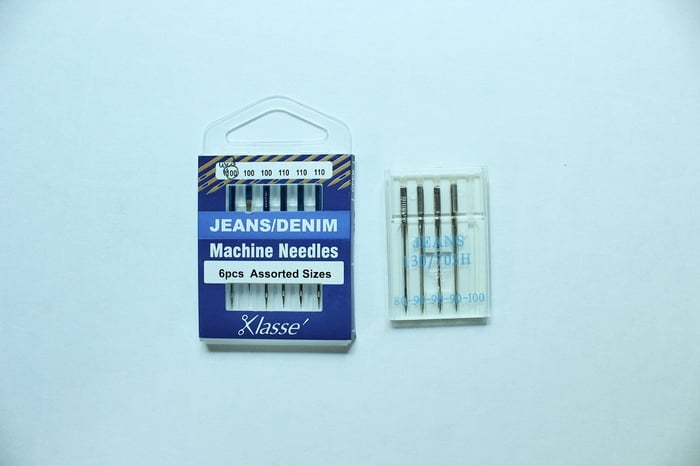
Choose the right sewing needle - Depending on the denim thickness, choose an appropriate denim/jean needle. Jean needles have an extra-sharp tip for penetrating thick fabric and a bigger eye to accommodate thicker threads. Use a 90/14 needle for light to medium-weight denim and a 100/16 or 110/18 for heavyweight denim. If you don't have any denim needles, universal needles work just fine and achieve neat stitches.
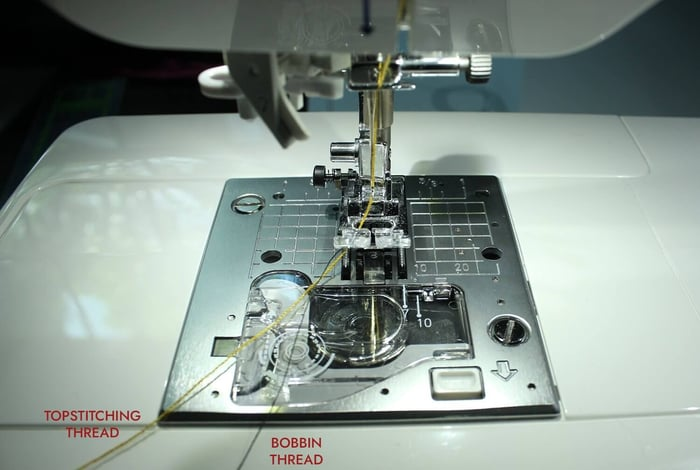
Thread Selection for How to Hem Jeans
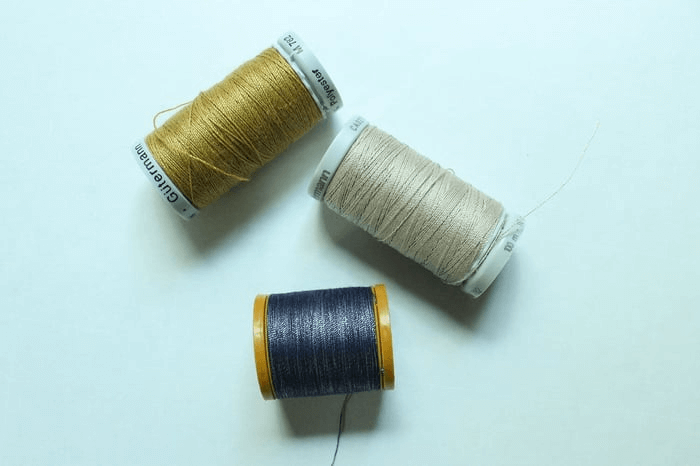

Choose strong thread - Heavy-duty thread ensures that the hem is durable and adds detail to topstitching since these types of threads are thicker. Always use regular thread on your bobbin.
Pressing Tips
Press as you go - When pressing denim, use the high temperature cotton setting and apply steam when necessary. Since denim is quite thick, more pressing than usual might be needed.
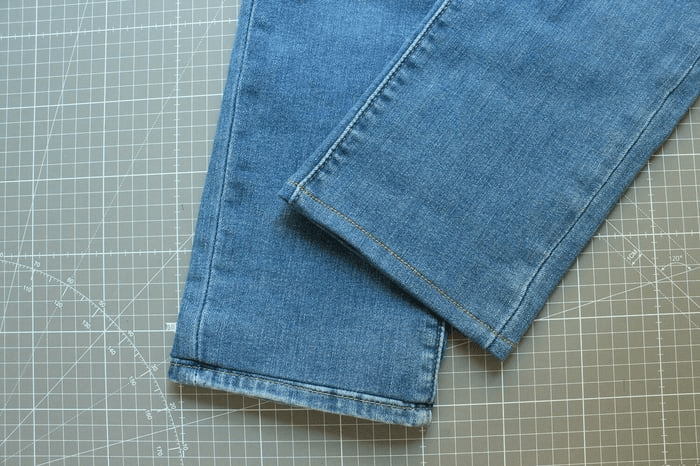
Method 1: Machine-Sewn Original Hem (Keep the Authentic Look)
Best for: Designer jeans, distressed denim, when you want to preserve the original wash and wear
This is the most popular way to hem jeans while keeping the original hem attached, so your jeans maintain their authentic character.

Step-by-Step Instructions:
Step 1: Try On and Mark
- Put on the jeans with the shoes you'll typically wear them with
- Fold up the leg to your desired length
- Use pins or fabric marker to mark the fold line on the inside
- Make sure both legs are the same length
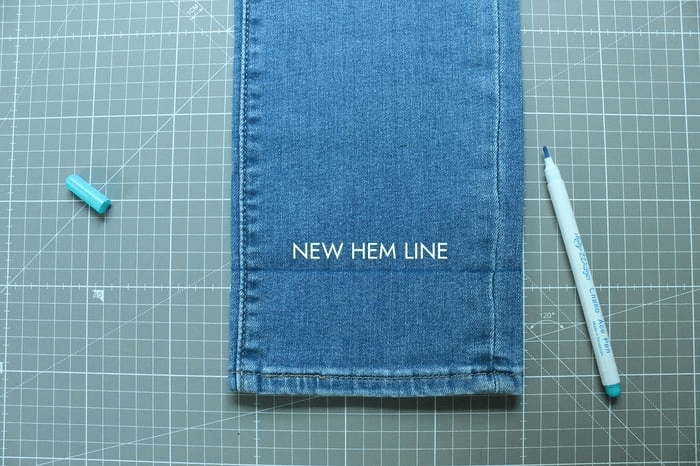
Step 2: Lay Flat and Mark Around Leg

- Lay the marked leg flat, carefully aligning the back and front hems and the side seams
- Mark around the entire leg at that same height (for example, the distance might be 2.4 inches / 6 cm)
- Mark a line with removable fabric marker
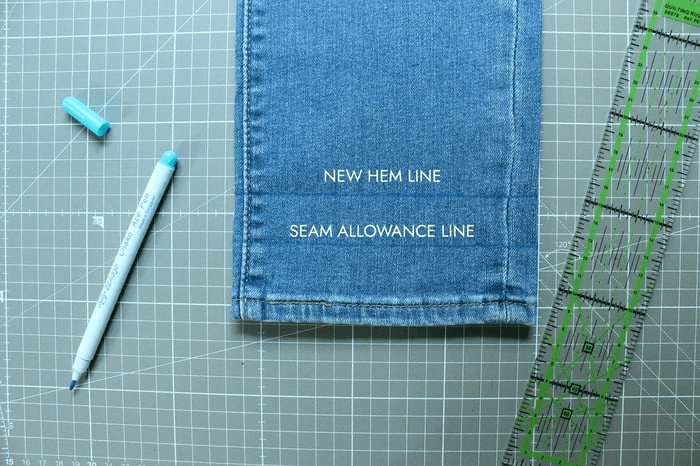
Step 3: Measure and Mark Cut Lines
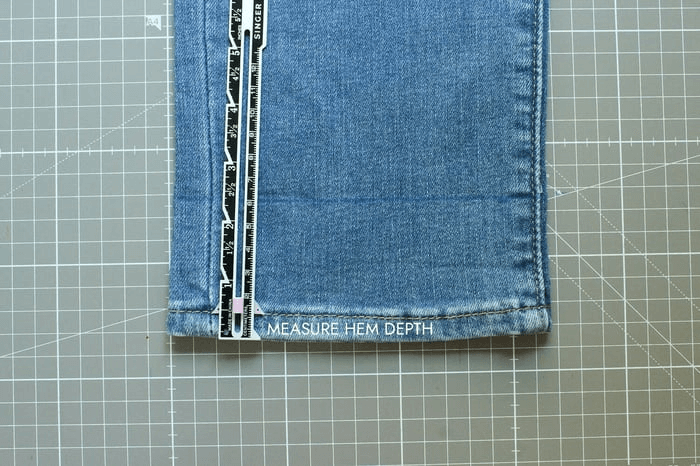
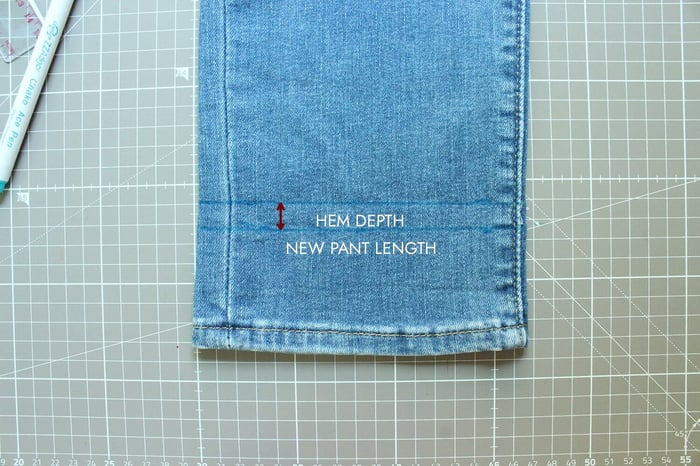
- Measure the depth of the original hem from the very bottom edge to the topstitching line (usually about ½ inch / 13mm)
- Draw another ½ inch (13mm) line above the first line
- Make sure these lines are the same on both pant legs; otherwise, you'll end up with uneven hems
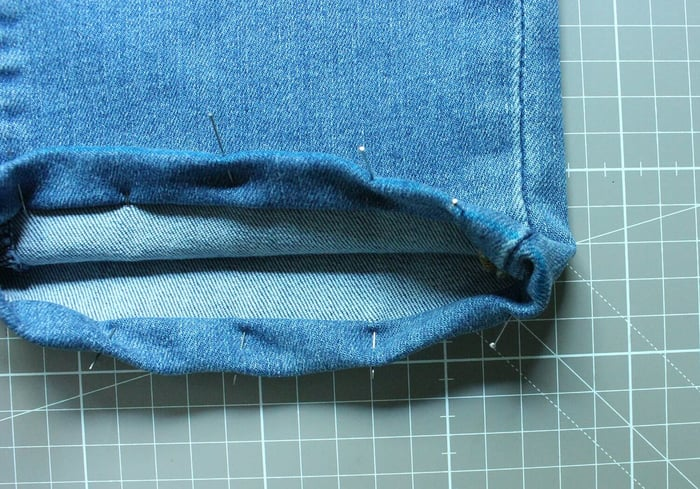
Step 4: Fold and Pin
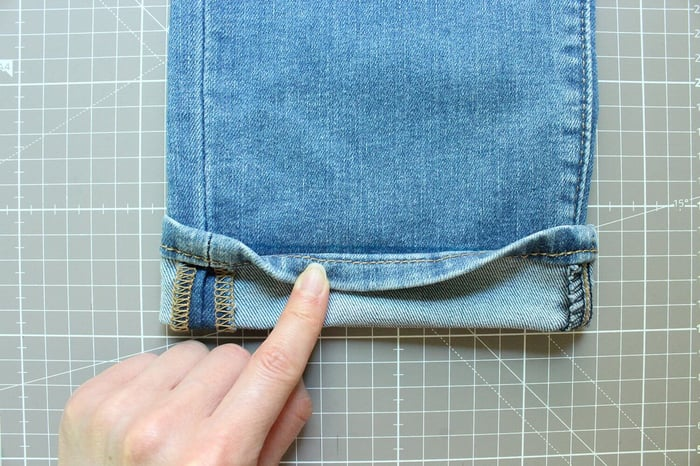
- Fold the leg UP so the original hem's topstitching aligns with the TOP marked line
- The original hem should now sit where you want the new finished length
- Pin in place all around the leg
Step 5: Sew
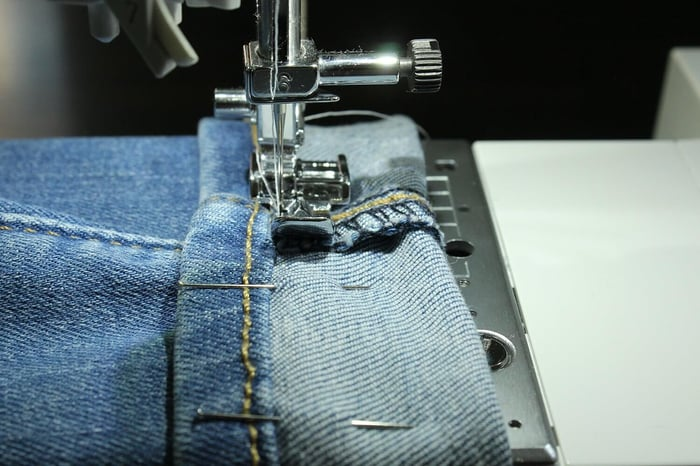
- Use regular sewing thread for both upper and bobbin thread
- Set stitch length to 3-4mm
- Slide the end of the pant leg under the needle
- Starting at the inseam, stitch around the leg as close as possible to the original topstitching
- Using a zipper foot may help keep an even seam
- Backstitch at start and finish
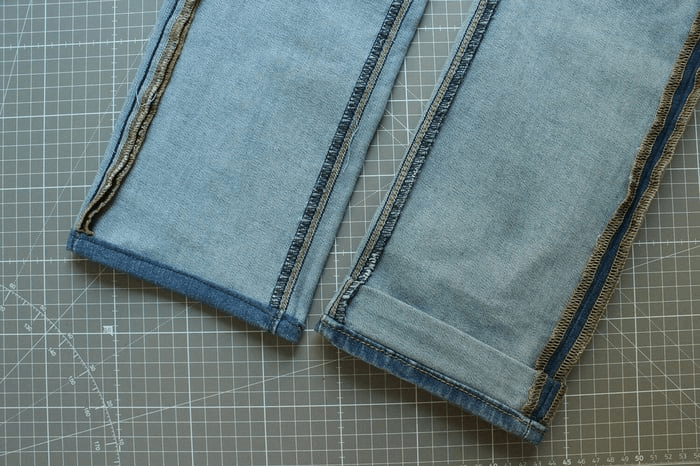
Step 6: Trim and Finish
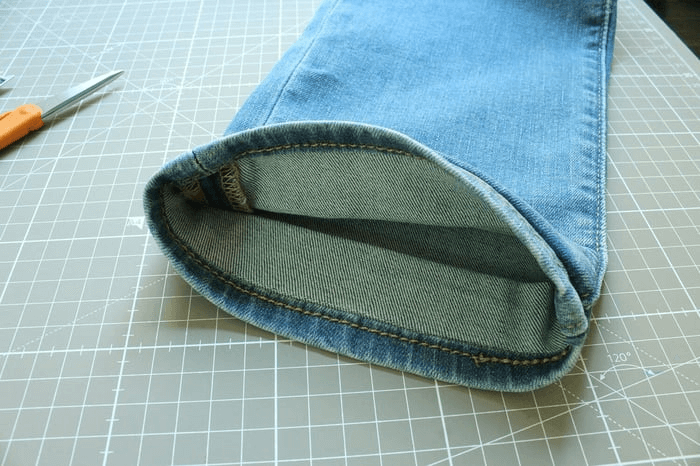
- Press the fold of excess fabric up and away from the hem
- If the fold is quite wide, trim it down to ⅝ inch (1.5 cm)
- Finish raw edge with serger or zigzag stitch
- Give the hem a final press
Step 7: Repeat for Other Leg

Pros and Cons:
✅ Pros:
- Preserves original distressing and wash
- Looks professional
- Perfect for expensive or designer jeans
- Authentic character maintained
❌ Cons:
- Can be bulky with thick denim
- Can't cuff jeans after (visible seam inside)
- More advanced technique
- Creates stiff line around hemline on heavy denim
Note: This method keeps the original hem intact, and the character of the jeans is not lost. However, depending on the denim weight, it can add bulk. Cuffing jeans is not an option anymore since the inside seam will be visible.
Method 2: Traditional Machine-Sewn Hem (Clean New Finish)
Best for: Lightweight-to-medium denim, when you want a clean finish, or when original hem is damaged
This creates a brand new hem that will develop its own character over time. Many people prefer this method when learning how to hem jeans because it's straightforward.
Step-by-Step Instructions:
Step 1: Try On and Mark
- Put on jeans with appropriate shoes
- Mark desired finished length with pins or water-soluble pen
- Check both legs are even
Step 2: Cut to Length
- Lay jeans flat on a flat surface, aligning seams
- From marked line, measure down 1 inch (2.5 cm) - this is your seam allowance
- Mark and cut along this line
- Repeat for other leg
Step 3: Create Double-Fold Hem

- Fold raw edge up ½ inch (13mm), press with iron
- Fold again another ½ inch, enclosing the raw edge
- Press the double-folded hem and secure with pins in place
Step 4: Sew the Hem
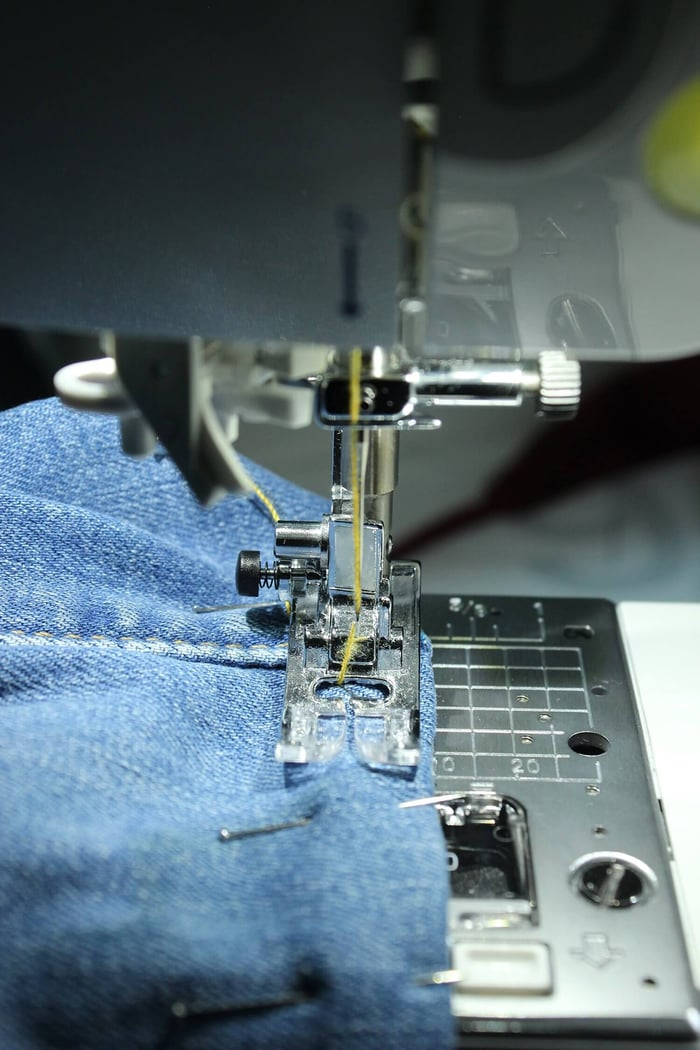
- Thread the top of the machine with denim thread and use all-purpose thread in the bobbin
- Use denim needle (90/14 or 100/16)
- Set stitch length to 3-4mm
- With the hem on the right side, begin on the inseam with a straight stitch
- Sew around the hem close to the inner fold edge
- Backstitch at start and finish
Step 5: Press and Finish
- Give hem a final press
- Repeat for other leg
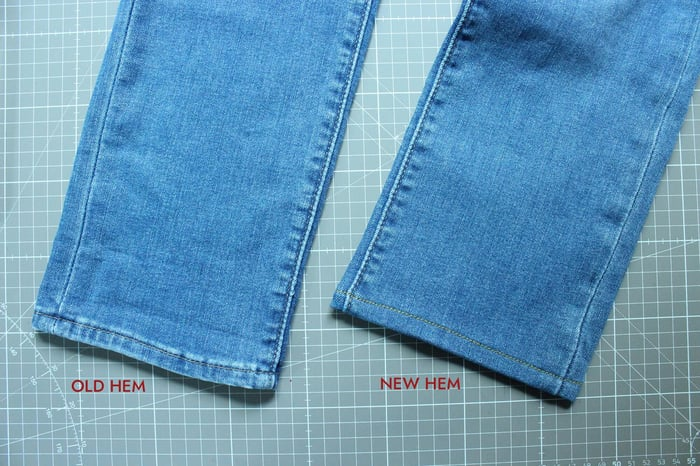
Optional: Distressing Your New Hem
Even though the original hem is lost, if you wash and wear your jeans regularly, the wavy lines and fading will happen naturally, but it may take time. There are ways to distress the hem faster:
- Sandpaper method: Gently rub sandpaper along the hem edge
- Razor blade: Carefully scrape along the fold line (be gentle!)
- Washing: Wash repeatedly with tennis balls in the dryer to create natural wear
Pros and Cons:
✅ Pros:
- Less bulk than original hem method
- Clean, professional finish
- Works on any denim weight
- Can still cuff jeans
- Good for damaged original hems
❌ Cons:
- Loses original distressing (but develops new character over time)
- Requires sewing machine
- New hem won't match original right away
Method 3: Hand-Sewn Hem (No Sewing Machine Needed)
Best for: No machine access, delicate control, learning to sew, or when you're traveling
You can absolutely hem jeans by hand! This method for how to hem jeans just takes a bit more time but gives you complete control.
Step-by-Step Instructions:
Step 1: Try On and Mark
Same as machine methods:
- Try on with appropriate shoes
- Mark desired length with pins
- Ensure both legs are even
Step 2: Cut and Prepare
- From marked line, measure down 1 inch (2.5 cm) and cut
- Fold raw edge up ½ inch, press with iron
- Fold again ½ inch, press and pin securely
Step 3: Thread Needle
- Use strong hand-sewing thread, doubled for extra durability
- Knot the end securely
- Thread color should match your jeans
Step 4: Choose Your Stitch
Option A: Slip Stitch (Nearly Invisible from Outside)
Best for a professional look where stitches barely show:
- Working from inside the jean leg, slide needle through the folded edge about ¼ inch
- Pick up just 1-2 threads from the jean fabric (outside layer)
- Go back into the folded edge and slide needle ¼ inch forward
- Repeat around entire hem
- Keep stitches small, even, and relatively loose (too tight will pucker)
Option B: Catch Stitch (More Secure, Slight Stitching Visible)
Best for durability:
- Working left to right, catch a few threads from the folded edge
- Move slightly right and catch a few threads from the jean layer
- Continue creating small X-patterns around the hem
- Keep stitches loose enough to allow fabric flexibility
- Space stitches about ¼ inch apart
Step 5: Secure and Finish
- When you complete the circle, make several small stitches in the same spot
- Tie off thread securely with a knot
- Press hem with iron
- Repeat for other leg
Pros and Cons:
✅ Pros:
- No sewing machine needed
- More control over stitch placement
- Very durable when done correctly
- Portable (can do anywhere)
- Nearly invisible from outside (slip stitch method)
❌ Cons:
- Takes longer (45-60 minutes per leg)
- Hand can get tired with thick denim
- Requires patience
- Not ideal for very heavy denim
Method 4: No-Sew Options (Quick Temporary Fix)
Best for: Rentals, borrowed jeans, quick fixes, temporary alterations, or if you don't sew at all
If you need to know how to hem jeans without sewing, these temporary methods work great.
Option A: Hemming Tape
Instructions:
- Fold jeans to desired length, press firmly with iron
- Fold raw edge under ½ inch to create clean finish
- Insert hem tape between the two layers
- Press with hot iron (no steam) for 10-15 seconds
- Let cool completely before wearing
- Wait 24 hours before washing
Durability: Lasts 10-20 washes if applied correctly
Option B: Fabric Glue
Instructions:
- Fold hem to desired length, press
- Apply thin, even line of fabric glue between layers
- Press layers together firmly
- Let dry completely (24 hours minimum)
- Wait 72 hours before first wash
Durability: Less durable than tape, may need reapplication after 5-10 washes
Pros and Cons:
✅ Pros:
- No sewing skills required
- Fastest method (15 minutes or less)
- Reversible (can remove and rehem)
- Perfect for kids' jeans they're growing into
❌ Cons:
- Not as durable as sewn hems
- May come undone after many washes
- Not suitable for jeans you plan to keep long-term
Essential Tips for Perfect Jean Hems Every Time
Now that you understand how to hem jeans, here are some pro tips to ensure perfect results:
Before You Start:
- Always try on with shoes - The right length changes depending on heel height
- Wash and dry first - Jeans can shrink up to 1-2 inches. Always hem after the first wash.
- Check both legs - Use a measuring tape to ensure both legs are identical distance
- Consider the shoe - Different shoes = different hem lengths needed
While Sewing:
- Use the right needle - Size 90/14 for medium denim, 100/16 for heavy
- Lengthen stitch length - Use 3-4mm stitch length for clean stitches
- Press, press, press - Press after every step for professional results
- Hammer bulky seams - Use a mallet to flatten thick side seams before sewing
- Go slow at seams - When crossing thick seams, slow down and use hand wheel if needed
Common Problems When Hemming Jeans & Solutions
Problem: Hem is Puckered/Wavy
Solutions: Loosen upper thread tension by 1-2 numbers, increase stitch length to 3.5-4mm, press hem thoroughly before AND after sewing
Problem: Needle Breaks on Thick Seams
Solutions: Use larger denim needle (100/16 or 110/18), hammer seams flat with mallet before sewing, use hand wheel to manually turn over thick parts, slow down machine speed significantly at seams
Problem: Thread Breaks While Sewing
Solutions: Use fresh, quality thread, change needle, check bobbin is wound correctly, reduce thread tension
When to Use Each Method for Hemming Jeans
Use Original Hem Method When:
- Jeans cost over $100 (designer brands)
- Original hem has unique distressing you love
- Hemming raw/selvedge denim
- Jeans have special details (embroidery, studs)
Use Traditional Hem Method When:
- Original hem is damaged or worn out
- Denim is very thick and you want to avoid bulk
- You want a clean, professional look
- Working with lightweight or stretchy denim
Use Hand-Sewing Method When:
- You don't have access to a sewing machine
- Working with delicate vintage denim
- You want nearly invisible stitching
- You're traveling and need to hem on the go
Use No-Sew Method When:
- It's a temporary situation
- You need a quick fix before an event
- Hemming jeans for growing kids
Ready to Make Your Own Pants?
If you enjoyed learning how to hem jeans and want to take your sewing to the next level, why not try making your own pants from scratch?
Benefits: Perfect fit every time, choose your own fabric, custom pockets, save money long-term, sustainable fashion choice
Women's Pants & Skirts - From casual joggers to tailored trousers
Kids' Pants Patterns - Durable, comfortable pants your kids will love
Beginner-Friendly Patterns - New to sewing? Start here
When to Take Jeans to a Professional Tailor
Sometimes professional hemming is worth the investment:
Consider a tailor when: Jeans cost over $200 (designer brands), you're extremely nervous about cutting them, jeans have special details you might damage, denim is very heavy weight and you don't have proper equipment
Average Cost: Basic hem $10-15, original hem $15-25
Break-even: If you hem just 3 pairs yourself instead of paying $15 each, you've saved $45!
Final Thoughts on How to Hem Jeans
Learning how to hem jeans is one of the most practical and rewarding sewing skills you can master. Whether you use a machine, hand-sew, or try the no-sew route, being able to adjust the length of your jeans means better fit and style, saving money, shopping freely, extended wardrobe life, and making sustainable choices.
Remember: Start with an old pair you don't love for practice. Once you've successfully hemmed 2-3 pairs, it becomes second nature and takes less than 30 minutes per pair. By your 5th pair, you'll be hemming like a pro!
Now that you know how to hem jeans, you'll never have to pay a tailor again!
💬 Join Our Sewing Community
Join our Facebook Group to share your hemmed jeans transformations, get feedback and advice, find answers to your questions, and connect with the sewing community!
Related Articles You'll Love:
- Top 10 Pants Patterns for Kids
- Patching a Hole in Jeans
- Adding a Soft Waistband
- How to Prepare Fabric for Sewing
- 30 Top Sewing Tools
Last Updated: December 2025
Reading Time: 18 minutes
Have you successfully hemmed your jeans using this guide? We'd love to hear about it! Leave a comment below!
FAQs
How to Hem Jeans FAQ
Frequently Asked Questions About How to Hem Jeans
Can I hem jeans without cutting them?
Yes! Fold to desired length and hand-sew with large running stitches that can be removed later. Or use temporary hem tape. This is perfect for growing kids or if you're unsure about the length.
How do I hem jeans with thick side seams?
Lay jeans flat on hard surface and hit firmly with rubber or wooden mallet 10-15 times to flatten. While sewing, slow down significantly when approaching seam and use hand wheel to manually turn over the seam.
What if I don't have a denim needle?
Universal needles work fine: use a larger size (90/14 or 100/16 minimum), go slower especially over seams, change needle more frequently, and be prepared with backup needles.
How do I get that "worn" look on a new hem?
Sandpaper method (easiest): Use 60-grit sandpaper and rub along the hem fold line. Natural method (best): Just wear them! Wash with tennis balls in dryer. Takes 6-12 months but looks most realistic.
Can I hem stretchy/jegging-style jeans?
Absolutely! Use a ballpoint or stretch needle (size 75/11 or 80/12). Consider using a zig-zag stitch or double-needle for stretch hem. Don't pull fabric while sewing - let feed dogs do the work.