Coverstitch for Beginners 2025: Complete Guide to Coverstitch Machines & Techniques
Table of Contents
- Quick Reference: Coverstitch vs Other Methods
- What is a Coverstitch?
- What Machine Sews This Stitch? Can a Serger or Sewing Machine do it too?
- Do I Need a Coverstitch Machine to Sew With Knits?
- Types of Coverstitches: 2-Needle vs 3-Needle
- How to Hem with Coverstitch Machines?
- Setting Up Your Coverstitch Machine
- Common Coverstitch Applications
- Troubleshooting Common Coverstitch Problems
- How to Remove a Coverstitch (Unpicking)
- Coverstitch vs Serger: Can One Machine Do Both?
- Which Coverstitch Machine to Buy?
- Maintenance Tips for Coverstitch Machines
- Projects Perfect for Practicing Coverstitch
- Conclusion: Is a Coverstitch Machine Worth It?
- FAQs
Ever wondered how store-bought t-shirts get those perfectly professional double-line hems on sleeves and necklines? That's a coverstitch! After years of sewing knit garments at Peek-a-Boo Pattern Shop, I can tell you that a coverstitch machine is one of the most game-changing tools you can add to your sewing room—but it's not essential for everyone.
This comprehensive guide will walk you through everything you need to know about coverstitching: what it is, when you actually need it, how to use a coverstitch machine, and whether the investment is worth it for your sewing goals. By the end, you'll know exactly whether a coverstitch machine belongs in your sewing space.
Quick Reference: Coverstitch vs Other Methods
| Method | Top Appearance | Bottom Appearance | Best For | Stretch | Machine Needed | Cost |
|---|---|---|---|---|---|---|
| Coverstitch | 2-3 parallel lines | Chain stitch (looped) | Professional hems on knits | Excellent | Coverstitch machine | $200-$600 |
| Twin Needle | 2 parallel lines | Zigzag | Home sewn knit hems | Good | Regular sewing machine | $5-10 |
| Serger Flatlock | Decorative ladder | Flat seam | Activewear, decorative | Excellent | Serger | $200-$800 |
| Straight Stitch | Single line | Single line | Woven fabrics only | None | Regular sewing machine | N/A |
| Zigzag | Zigzag line | Zigzag line | Basic knit finishing | Fair | Regular sewing machine | N/A |
What is a Coverstitch?
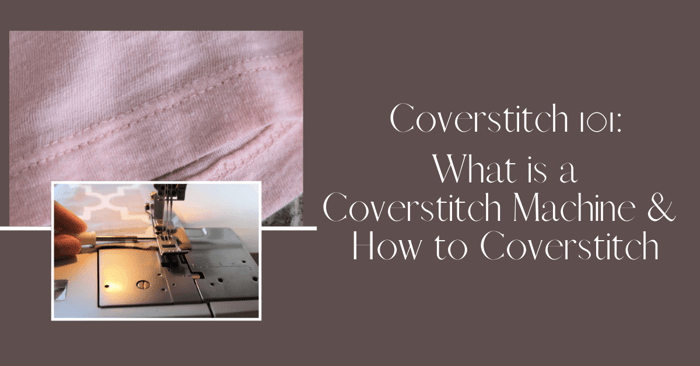
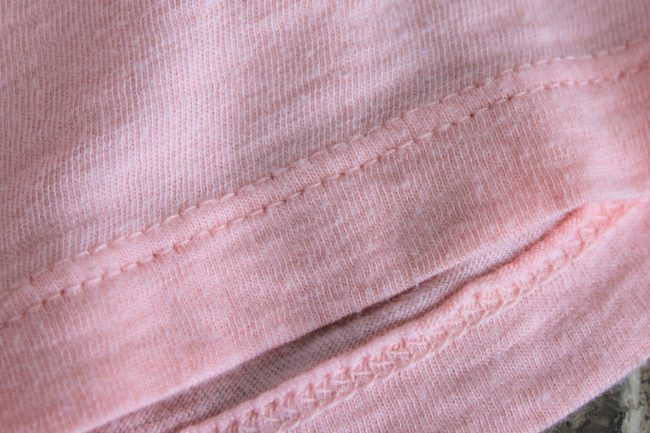
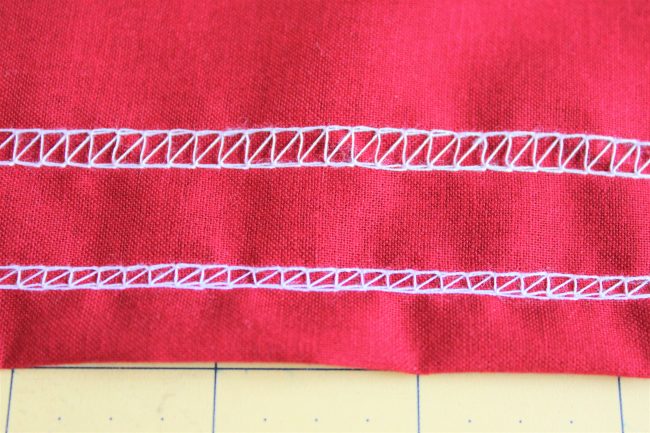
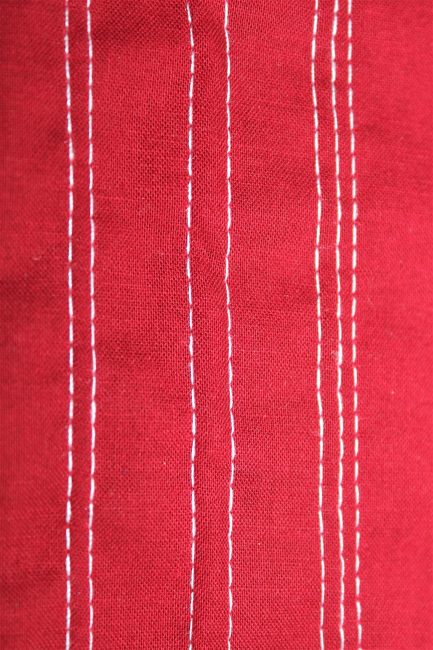
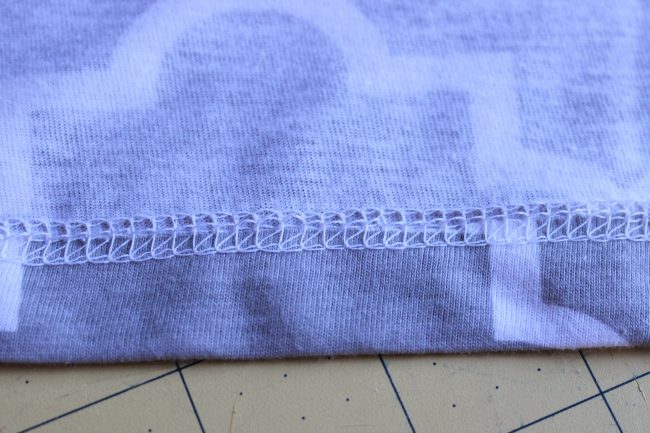
A coverstitch is a professional hemming stitch that creates two or three parallel rows of stitching on the fabric's right side and a chain stitch (looped) on the wrong side. It's the stitch you see on nearly every commercially made t-shirt, hoodie, and knit garment.
Where You'll See Coverstitching:
- T-shirt sleeve hems
- Neckline bindings
- Bottom hems on knit tops
- Waistbands on activewear
- Decorative topstitching on knits
The magic of coverstitching is that it's incredibly stretchy and durable. The chain stitch on the underside allows the fabric to stretch without breaking the thread, making it perfect for knit fabrics that need to move with your body.
Key Characteristics:
- Creates 2-3 needle lines on top
- Chain stitch on bottom
- Highly elastic (stretches with fabric)
- Professional, store-bought appearance
- Cannot be sewn on regular sewing machine
What Machine Sews This Stitch? Can a Serger or Sewing Machine do it too?
A coverstitch machine is a specialized machine designed specifically for this stitch. It's completely different from:
❌ Regular Sewing Machine: Cannot create true coverstitch (can fake it with twin needle)❌ Serger/Overlock: Trims and finishes edges, doesn't create coverstitch✅ Coverstitch Machine: Dedicated machine for professional hems✅ Combo Machine: Some machines combine serger + coverstitch functions
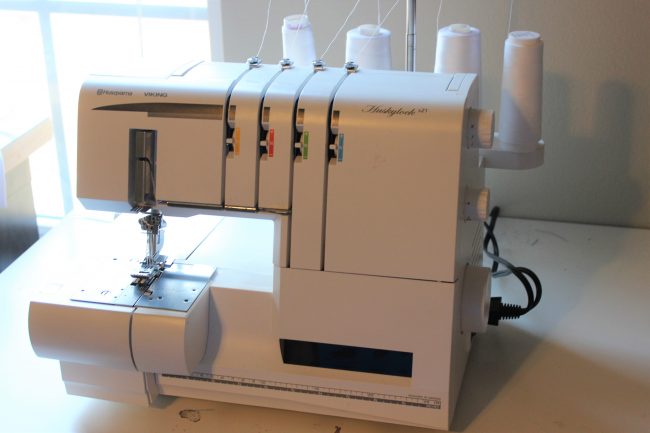
How a Coverstitch Machine Works
A coverstitch machine uses:
- 1, 2, or 3 needles (your choice based on desired look)
- 1 looper thread underneath that creates the chain stitch
- No knife (unlike sergers - coverstitch doesn't cut fabric)
The threads interlock to create a flexible, stretchy seam that won't pop when you pull on the fabric.
Do I Need a Coverstitch Machine to Sew With Knits?
This is the million-dollar question! The honest answer: it depends on what you sew.
You MIGHT Want a Coverstitch Machine If:
✅ You sew lots of knit garments (t-shirts, hoodies, leggings, activewear) ✅ You want professional-looking hems that match store-bought clothes ✅ You're selling handmade items and need that polished finish ✅ You sew often enough to justify the cost ($200-$600) ✅ You have space for another machine in your sewing room ✅ You're frustrated with twin needle results on your regular machine
You DON'T Need a Coverstitch Machine If:
❌ You rarely sew knits (stick to wovens mostly) ❌ You're happy with twin needle hems on your sewing machine ❌ You're on a tight budget ($200+ is significant) ❌ You have limited sewing space❌ You only sew occasionally (not worth the investment) ❌ You're a complete beginner (master regular machine first)
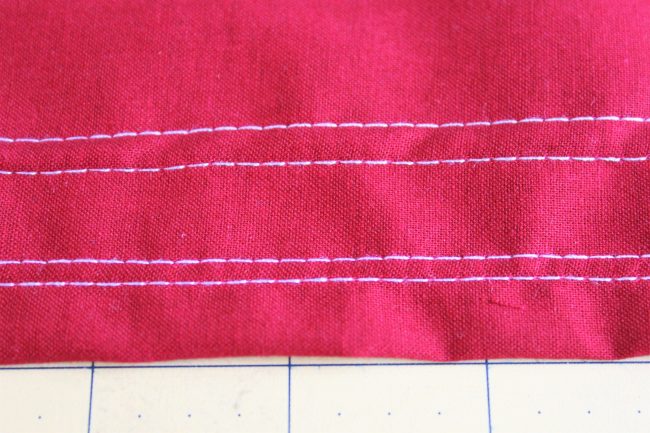
The Affordable Alternative: Twin Needle
Before investing in a coverstitch machine, try using a twin needle on your regular sewing machine. It creates a similar look on top (two parallel lines) with a zigzag stitch on the bottom. It's not the same as a true coverstitch, but it works great for home sewing!
Twin Needle Pros:
- Costs only $5-10
- Works on regular sewing machine you already own
- Creates professional-looking hems
- Good stretch for knit fabrics
Twin Needle Cons:
- Zigzag on bottom (not chain stitch)
- Less stretch than true coverstitch
- Can be finicky to adjust tension
- Not quite as professional-looking
My Recommendation: Start with twin needle. If you find yourself constantly frustrated or sewing knits weekly, then consider upgrading to a coverstitch machine.
Types of Coverstitches: 2-Needle vs 3-Needle
Most coverstitch machines offer multiple needle configurations. Here's when to use each:
2-Needle Narrow Coverstitch
Best For: Lightweight knits, delicate fabrics, preventing tunnelingAppearance: Two close parallel lines (approximately 1/4" apart)Common Uses:
- Baby clothes
- Lightweight t-shirts
- Sleeve hems on thin fabrics
2-Needle Wide Coverstitch
Best For: Medium to heavyweight knits, more durable finishAppearance: Two parallel lines spaced wider apart (approximately 1/2" apart)Common Uses:
- Adult t-shirts and hoodies
- Activewear
- Sweatshirt hems
- Most general sewing
3-Needle Coverstitch
Best For: Decorative topstitching, sporty look, extra durabilityAppearance: Three parallel linesCommon Uses:
- Athletic wear
- Decorative hems
- Statement topstitching
- Heavy-duty applications
Pro Tip: You can use different colored threads in each needle for a fun, decorative effect!
My Recommendation: For beginners, start with 2-needle wide coverstitch. It's the most versatile and forgiving. Practice on scraps before committing to your final garment.
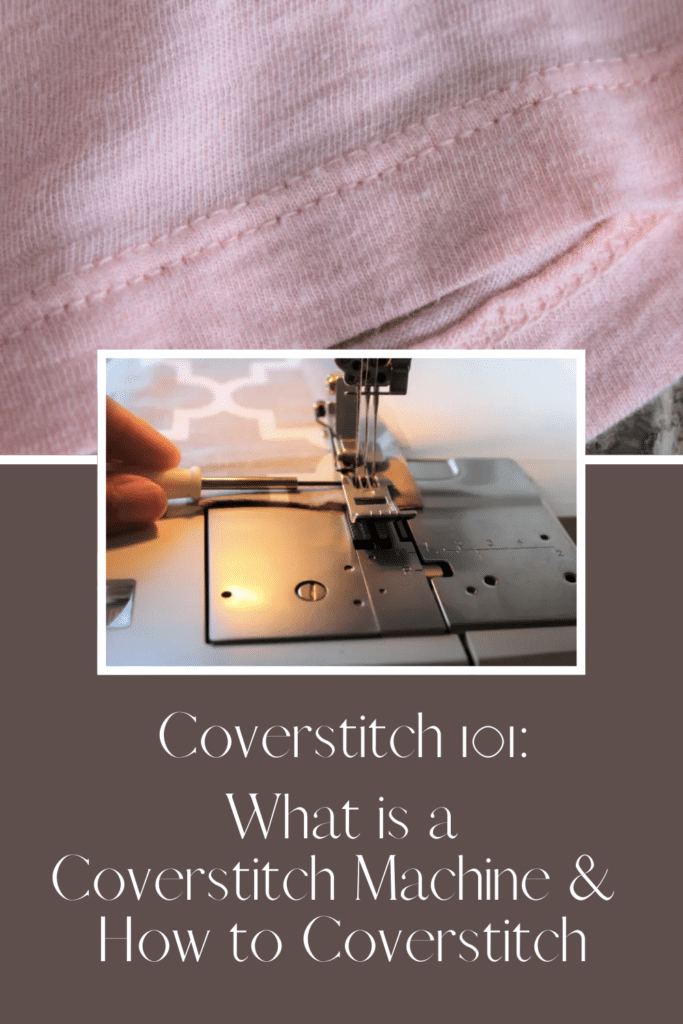
How to Hem with Coverstitch Machines?
Once you understand the basics, using a coverstitch machine is surprisingly straightforward. Here's the complete process:
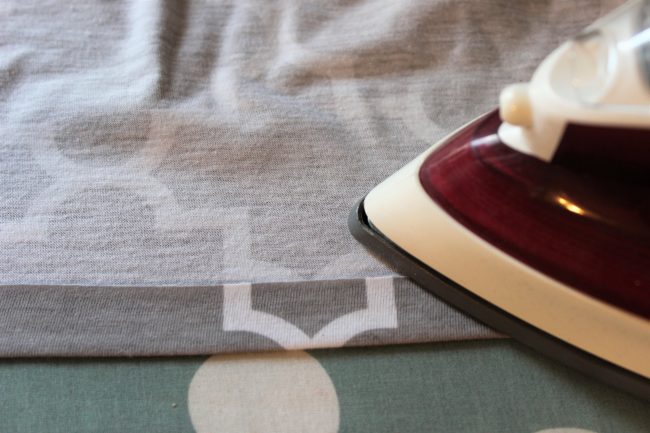
Step 1: Prepare Your Hem
Fold your hem allowance up toward the wrong side (back) of the fabric.
Press firmly with a hot iron to create a crisp crease. This is crucial—a well-pressed hem makes coverstitching much easier!
Step 2: Position Fabric Under Presser Foot
Raise the presser foot on your coverstitch machine.
Place your fabric underneath with the fold aligned with your chosen seam allowance guide on the machine.
Lower the presser foot and you're ready to sew!
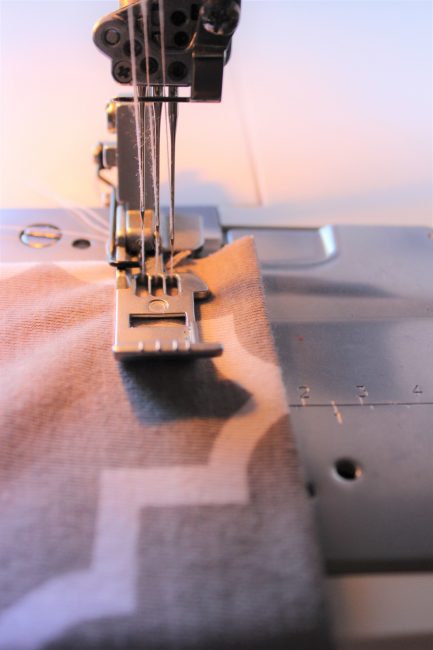
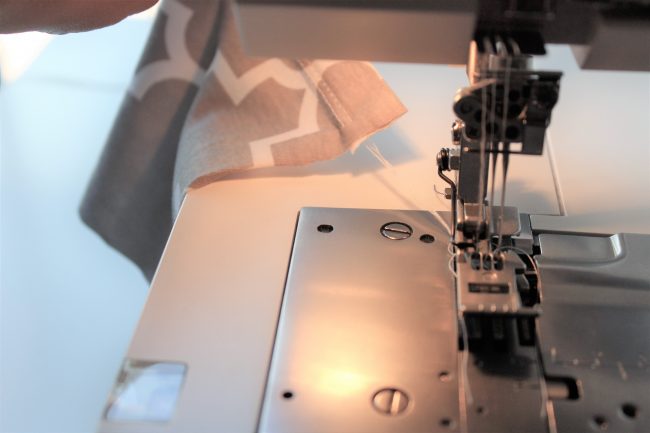
Step 3: Sew the Hem
Begin sewing slowly and guide the fabric gently. The machine will feed it through.
Watch your seam guide to keep the stitching straight and even.
Don't pull or push the fabric—let the machine do the work.
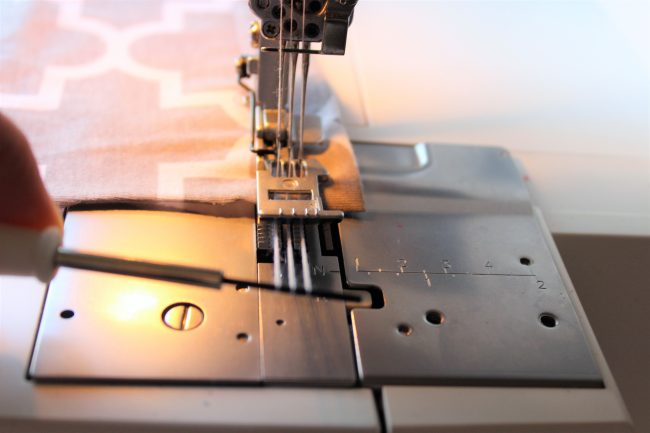
Step 4: Finish the Stitch (The Tricky Part!)
This is where beginners get confused, but it's simple once you know how:
When you reach the end of your seam:
- Lift presser foot and raise needles to highest position
- Use a long, thin tool (like a seam ripper or awl) to sweep under the presser foot from back to front
- This brings the needle threads toward you
- Snip the threads close to the fabric
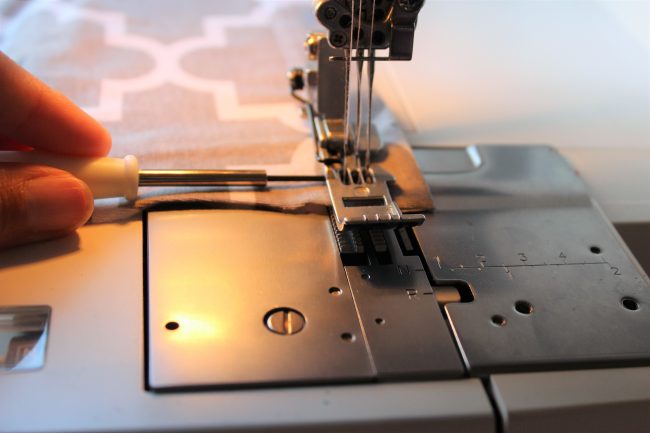
5. Pull fabric toward the back of the machine
6. This pulls all threads to the wrong side of fabric
7. Cut the looper thread and tie all threads in a knot
8. Done!
Important: Always tie off your coverstitch ends! Unlike a serger, coverstitch creates a chain that can unravel if not secured.
Setting Up Your Coverstitch Machine
Before you start sewing, proper setup is crucial for success.
Threading Your Machine
Coverstitch machines look complicated, but threading follows a logical path:
- Looper thread first (this is the most important!)
- Needle threads second (right to left usually)
- Follow color-coded guides on your machine
- Reference your manual - each machine is slightly different
Pro Tip: Take a photo of proper threading with your phone. When you forget (and you will!), you'll have a quick reference.
Choosing the Right Thread
For Looper: Use woolly nylon or texturized thread for best results. It creates a smooth, professional chain stitch and has excellent stretch properties.
For Needles: Use regular polyester or cotton-wrapped polyester thread. Match the weight to your fabric (lighter thread for light fabrics, heavier for thick knits).
Thread Weight Guidelines:
- Lightweight knits (t-shirt jersey): 50-60 weight thread
- Medium knits (sweatshirt fleece): 40 weight thread
- Heavyweight knits (french terry): 30-40 weight thread
Color Matching: Your needle thread shows on top, so match it to your fabric. The looper thread barely shows, so you can use a neutral color for everything.
Adjusting Tension
Tension on a coverstitch machine affects how your stitch looks and performs:
Too Tight: Fabric puckers, tunneling between needle linesToo Loose: Loops show on fabric surface, stitch looks messyJust Right: Flat, even stitches that lay smoothly on fabric
Start with manufacturer's recommended settings in your manual, then test on scrap fabric and adjust from there.
Stitch Length Recommendations
Short stitch length (2-2.5mm): Lightweight knits, delicate fabricsMedium stitch length (3mm): Most t-shirt weight knits, general sewingLong stitch length (3.5-4mm): Heavy knits, decorative topstitching
Common Coverstitch Applications
Once you master basic hemming, you can use your coverstitch machine for many applications:
1. Hemming in the Round
Perfect for sleeve hems, pant legs, and necklines. The key is to:
- Press hem well before starting
- Sew slowly and evenly
- Overlap stitches slightly when you complete the circle
- Secure thread ends properly
2. Attaching Neckbands
Coverstitch excels at securing ribbed neckbands to t-shirts and hoodies. The stretch in the stitch accommodates the stretch in the ribbing perfectly.
3. Decorative Topstitching
Use contrasting thread colors or the 3-needle option for eye-catching decorative details on:
- Waistbands
- Pocket edges
- Shoulder seams
- Center front details
4. Attaching Elastic
The coverstitch's stretch makes it ideal for attaching elastic waistbands to garments while maintaining comfort and flexibility.
5. Creating Flat Felled Seams
Some coverstitch machines can create flat, professional looking seams perfect for activewear and athletic garments.
Troubleshooting Common Coverstitch Problems
Even experienced sewists encounter coverstitch challenges. Here's how to fix the most common issues:
Problem: Skipped Stitches
Causes:
- Dull or bent needles
- Wrong needle type for fabric
- Threading error
- Machine needs cleaning
Solutions:
- Replace needles (use ballpoint for knits)
- Check threading path carefully
- Clean lint from looper area
- Ensure fabric isn't pulling or stretching
Problem: Fabric Tunneling (Puckering Between Needle Lines)
Causes:
- Tension too tight
- Stitch length too short
- Using narrow coverstitch on heavy fabric
- Fabric not pressed well
Solutions:
- Loosen needle tension slightly
- Increase stitch length
- Switch to wide coverstitch
- Press hem more firmly before sewing
Problem: Loops Showing on Fabric Surface
Causes:
- Looper tension too loose
- Threading error in looper
- Wrong thread type
Solutions:
- Tighten looper tension
- Re-thread looper carefully
- Use woolly nylon for looper thread
Problem: Uneven Stitch Lines
Causes:
- Not following seam guide
- Pulling or pushing fabric
- Presser foot pressure incorrect
Solutions:
- Watch seam guide more carefully
- Let machine feed fabric naturally
- Adjust presser foot pressure
Problem: Thread Keeps Breaking
Causes:
- Tension too tight
- Old or low-quality thread
- Burr on thread path
- Threading error
Solutions:
- Reduce tension
- Use fresh, quality thread
- Check for rough spots on machine
- Re-thread completely
How to Remove a Coverstitch (Unpicking)
Made a mistake? Don't panic! Removing a coverstitch is easier than you think:
The Fast Method (Chain Pull)
- Find the looper thread on the wrong side of fabric
- Gently pull it - the entire chain will unravel quickly
- Remove remaining needle threads from the right side
- Press fabric to remove stitch marks
Warning: This only works if you haven't crossed over your stitching. For circular hems or crossed stitches, use the slow method.
The Careful Method (Cutting)
- Use seam ripper or small scissors
- Cut looper thread every few inches on wrong side
- Pull apart sections gently
- Remove all thread pieces
- Press fabric to restore it
Pro Tip: Always start unpicking from the end of the stitching line and work backward. Be patient to avoid damaging your fabric!
Coverstitch vs Serger: Can One Machine Do Both?
This is a common question! Let's clarify:
Dedicated Coverstitch Machine
Pros:
- Does one thing perfectly
- Usually more reliable
- Simpler to thread and adjust
- More affordable ($200-$400)
Cons:
- Takes up space
- Can't serge seams
- Additional machine to maintain
Combo Machine (Serger + Coverstitch)
Pros:
- Two machines in one (saves space!)
- Can serge seams AND coverstitch
- Cost-effective ($300-$600)
- Great for small sewing spaces
Cons:
- Must switch between modes (annoying mid-project)
- More complex to learn
- If it breaks, you lose both functions
- Usually more expensive than entry-level options
Our Recommendations
Choose Dedicated Coverstitch If:
- You already own a serger you love
- You have space for multiple machines
- You coverstitch frequently
- You want the simplest experience
Choose Combo Machine If:
- You're buying your first serger
- Space is limited
- Budget allows for one quality machine
- You don't mind switching between functions
Which Coverstitch Machine to Buy?
When choosing a coverstitch machine, consider your budget and skill level and then decide which brand is right for you. We've put together our Top 10 Coverstitch Machines here which include options from Baby Lock, Brother, Janome, Bernette, and more.

Maintenance Tips for Coverstitch Machines
Keep your machine running smoothly with regular maintenance:
After Every Project
- Brush away lint from looper area
- Wipe down with soft cloth
- Cover machine when not in use
Weekly (For Frequent Sewists)
- Deep clean looper and needle areas
- Check for burrs or rough spots
- Test tension on scrap fabric
Monthly
- Oil machine according to manual
- Replace needles even if they look fine
- Check threading paths for lint buildup
Annually
- Professional service if available
- Deep cleaning of entire machine
- Replace worn parts as needed
Remember: A well-maintained coverstitch machine can last 10-20+ years!
Best Practices for Coverstitch Success
After years of coverstitching, here are my top tips:
1. Always Test First
Never coverstitch on your final garment without testing! Spend 5 minutes testing on scrap fabric with the same:
- Fabric weight and type
- Thread colors
- Stitch settings
- Hem allowance
2. Press, Press, Press
A well-pressed hem is 80% of coverstitch success. Use a hot iron and press firmly. The crisper your fold, the easier to sew and the better your results.
3. Start Simple
Begin with straight hems on t-shirt fabric. Master this before attempting:
- Circular hems (sleeves, necklines)
- Thick fabrics (fleece, french terry)
- Decorative stitching
- Attaching bindings
4. Use Quality Thread
Cheap thread causes 90% of tension problems. Invest in good thread—it's worth it. One bad spool can waste hours of troubleshooting.
5. Keep Your Machine Happy
Clean your machine regularly and oil when needed. A lint-clogged looper causes endless problems.
6. Join a Community
Learn from others! Join our Facebook Group or online sewing communities where people share coverstitch tips and troubleshooting advice.
Projects Perfect for Practicing Coverstitch
Ready to put your new skills to use? Try these beginner-friendly projects:
Beginner Level
- Basic t-shirt hems - Straight hems are perfect practice
- Pillowcase with decorative bands - Flat sewing, no curves
- Simple headbands - Quick and satisfying
Intermediate Level
- Complete t-shirts - Hem sleeves, bottom, neckline
- Jogger pants - Hem legs and waistband
- Hoodies - Multiple hems plus neckline practice
Advanced Level
- Activewear with binding - Combining techniques
- Decorative topstitching - Using coverstitch creatively
- Upcycling store-bought items - Re-hemming with coverstitch
Browse our knit sewing patterns for more project ideas perfect for practicing your new coverstitch skills!
Conclusion: Is a Coverstitch Machine Worth It?
After covering everything about coverstitching, here's my honest take:
Invest in a coverstitch machine if:✅ You sew knit garments weekly or more ✅ You're frustrated with twin needle results ✅ You want professional-looking hems ✅ You're selling handmade items ✅ You have space and budget ($200-$600)
Stick with twin needle on your sewing machine if:❌ You rarely sew knits ❌ You're happy with your current hem results ❌ Budget is tight ❌ You're still mastering basic sewing skills ❌ Space is limited
The Bottom Line: A coverstitch machine creates beautiful, professional hems that are impossible to achieve any other way. But it's a specialized tool—not essential for everyone.
Start by mastering your regular sewing machine and twin needle. If you find yourself sewing knits constantly and wanting better results, then a coverstitch machine is an investment that will transform your garment sewing.
Ready to explore coverstitch machines?
- Check out our Top 10 Coverstitch Machines buying guide
- Join our Facebook Group for tips and support
- Browse knit sewing patterns perfect for practicing
- Follow us on Instagram for inspiration
Happy coverstitching!
FAQs
Coverstitch FAQ
Frequently Asked Questions
Can I use a regular sewing machine for coverstitching?
No, a regular sewing machine cannot create a true coverstitch. However, you can create a similar-looking hem using a twin needle on your regular machine. It produces two parallel lines on top (like a coverstitch) but creates a zigzag stitch underneath instead of a chain stitch. It's a good alternative if you don't want to invest in a coverstitch machine.
What's the difference between a coverstitch and a serger stitch?
A serger (overlock stitch) trims the fabric edge and encloses it with thread to prevent fraying. It's used for seam finishing and construction. A coverstitch doesn't trim fabric—it creates a decorative/functional hem with parallel needle lines on top and a chain stitch underneath. Sergers finish edges; coverstitches finish hems.
How much does a coverstitch machine cost?
Entry-level coverstitch machines start around $200-$300 (like basic Brother or Janome models). Mid-range machines cost $400-$600 (better brands like Bernette or Juki). High-end machines can be $800+ (Baby Lock, Bernina). Combo serger/coverstitch machines typically range from $300-$800 depending on features.
Is coverstitching hard to learn?
Not at all! While coverstitch machines look intimidating, they're actually simpler than sergers. The trickiest parts are threading (which gets easier with practice) and finishing thread ends. Most beginners are creating beautiful hems within an hour of practicing. Start with simple straight hems on scrap fabric before tackling circular hems.
Do I need special thread for coverstitching?
For best results, use woolly nylon or texturized thread in the looper. For needles, regular polyester or cotton-wrapped polyester thread works great. You don't need expensive specialty thread, but quality matters—cheap thread causes more tension and breakage problems.
Can I coverstitch woven fabrics?
While you technically can, it's not ideal. Coverstitching is designed for knit fabrics that need stretch. On woven fabrics, the chain stitch on the underside can add unnecessary bulk. For wovens, a regular straight stitch or blind hem on your sewing machine works better.
What's the most versatile coverstitch for beginners?
The 2-needle wide coverstitch is most versatile. It works on most fabric weights, looks professional, and is forgiving for beginners. Once you're comfortable, experiment with narrow or 3-needle stitches for specific projects.
How do I prevent tunneling between coverstitch lines?
Tunneling (fabric puckering between needle lines) usually means your tension is too tight or stitch length too short. Try: loosening needle tension slightly, increasing stitch length to 3-3.5mm, switching to wide coverstitch instead of narrow, and ensuring your hem is pressed very flat before sewing.
Can a coverstitch machine replace my serger?
No—they do completely different jobs. A serger trims fabric and finishes seam edges. A coverstitch creates decorative/functional hems without cutting anything. Many sewists who sew knits regularly own both machines, or invest in a combo machine that does both functions.
What should I look for when buying my first coverstitch machine?
For beginners, prioritize: easy threading (color-coded paths), adjustable stitch length, both narrow and wide needle options, good manual/tutorials included, reliable brand (Brother, Janome, Juki), and reasonable price ($200-$400 range). Avoid overly complicated machines or cheap off-brands.